Dynamically generate CSV using servlet
To dynamically generate CSV using servlet below are needed:
- Eclipse 3.2 or above (Download eclipse from here) — We are using Eclipse Kepler for this demo
- JDK 1.6 or above (Download from here)
- Tomcat 6 or above (Please follow link to install and configure tomcat in eclipse: Configure and Run Tomcat server in eclipse)
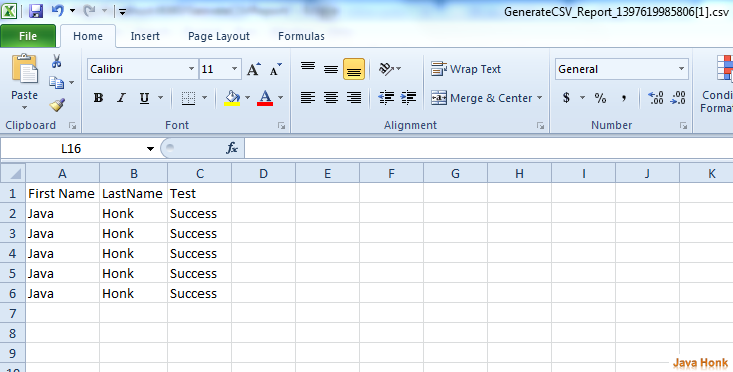
After all set up and configuration you will see below generated CSV sheet:

Please follow below steps:
- Create dynamic web project in eclipse name: GenerateCSVReport (Please use this link if you are not familiar how to create dynamic project in eclipse: Create Dynamic Web Project Eclipse)
- Once you create dynamic project it should look as below structure:

- Create package name com.javahonk inside src folder
- Create servlet class name CSVReportServlet.java inside com.javahonk package and copy paste below code:
package com.javahonk;

import java.io.IOException;
import java.util.ArrayList;
import java.util.Iterator;

import javax.servlet.ServletException;
import javax.servlet.annotation.WebServlet;
import javax.servlet.http.HttpServlet;
import javax.servlet.http.HttpServletRequest;
import javax.servlet.http.HttpServletResponse;

/**
 * @author Java Honk
 * Servlet implementation class ReportServlet
 */
@WebServlet("/CSVReportServlet")
public class CSVReportServlet extends HttpServlet {
    private static final long serialVersionUID = 1L;

    /**
     * @see HttpServlet#HttpServlet()
     */
    public CSVReportServlet() {
        super();
        // TODO Auto-generated constructor stub
    }

    /**
     * @see HttpServlet#doGet(HttpServletRequest request,
     *  HttpServletResponse response)
     */
    protected void doGet(HttpServletRequest request,
            HttpServletResponse response)
                    throws ServletException, IOException {

        response.setContentType("text/csv");
        String reportName =  "GenerateCSV_Report_"
                +System.currentTimeMillis()+".csv";
        response.setHeader("Content-disposition", "attachment; " +
                "filename=" + reportName);

        ArrayList<String> rows = new ArrayList<String>();
        rows.add("First Name,LastName,Test");
        rows.add("\n");

        for (int i = 0; i < 5; i++) {
            rows.add("Java,Honk,Success");
            rows.add("\n");
        }

        Iterator<String> iter = rows.iterator();
        while (iter.hasNext()){
            String outputString = (String) iter.next();
            response.getOutputStream().print(outputString);
        }

        response.getOutputStream().flush();

    }

}
- Create index.jsp inside WebContent folder and copy paste below code:
<%@ page language="java" contentType="text/html; charset=ISO-8859-1"
    pageEncoding="ISO-8859-1"%>
<!DOCTYPE html PUBLIC "-//W3C//DTD HTML 4.01 Transitional//EN" "http://www.w3.org/TR/html4/loose.dtd">
<html>
<head>
<meta http-equiv="Content-Type" content="text/html; charset=ISO-8859-1">
<title>Generate CSV report</title>
</head>
<body>
<form action="CSVReportServlet">
<input type="submit" value="Generate CSV report">
</form>
</body>
</html>
- Final project structure will be as below:

- Now we are ready to generate CSV using tomcat server. If you haven’t done tomcat set up in eclipse yet please use this link: Configure and Run Tomcat server in eclipse. Now right click project –>Run As –> Run on server.
- You will see below jsp page:

- Click Generate CSV report. Below pop-up will be Open, Save and Cancel button. For demo we have clicked Open button to open generated CSV file:

- Once you clicked Open button finally you will see below generated CSV file:

- That’s it dynamically generate CSV using servlet created successfully.
![]() Download GenrateCSVReport
Download GenrateCSVReport

Thanks. really helped get my pdf reporting to work by understanding basic use of servlet and expanding on what you showed above.
Great to hear.
Could you please tell how can i sent the same request to servlet via ajax.
thanks its really worked
Cool! Thanks a lot!
thank you. worked from me
HOW TO GENERATE CSV REPORT IN JAVA USING SERVLET BY TAKING QUERY FROM SQL ?