
JAX-WS web service eclipse
This tutorial will show you how to create JAX-WS annotation based web service using Apache CXF run time using eclipse.If you are not familiar with JAX-WS please read this oracle tutorial here
Below are need to build JAX-WS CXF web service:
- Eclipse 3.2 or above (Download eclipse from here) — We are using Eclipse Kepler for this demo
- JDK 1.6 or above (Download from here)
- Tomcat 6 or above (Please follow link to install and configure tomcat in eclipse: Configure and Run Tomcat server in eclipse)
- Apache CXF run time download from here
Step 1: Set up CXF run time environment using this tutorial
Step 2: Create dynamic web project name CalculateWebService in eclipse (If you are not sure how to create dynamic project in eclipse please use this link)
Step 3: Set tomcat server to run this ( Please follow this link to set up tomcat server in eclipse)
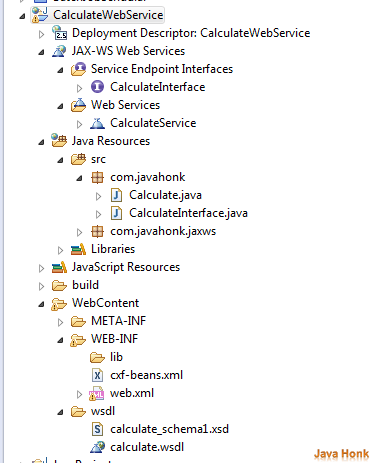
Step 4: Once dynamic web project created in eclipse it should look same as below

Step 5: Create package name com.javahonk inside src folder
Step 6: Create class name Calculate.java inside com.javahonk package and copy paste below sample code where we have created three service operation calculateSum, multiplyNumber and divideNumber to do simple operaton.
package com.javahonk;

public class Calculate {

    public Integer calculateSum(int i, int j) {
    return i + j;
    }

    public Integer multiplyNumber(int i, int j) {
    return i * j;
    }

    public Integer divideNumber(int i, int j) {
    return i / j;
    }


}
Step 7: Now right click project –> New –> Other

Step 8: Select Web Services –> Web Service –> Next

Step 9: On web services window please select as below:
- Web Service type: Bottom up Java bean Web Service
- Service implementation: Browse and choose Calculate which is our class
- Configuration: Server run time tomcat 7 as we already set up in step 3
- Web Service runtime: Click and choose Apache CXF 2.x then click OK ( Note we already set up CXF run time in step 1 –> This is very important otherwise you will get error)

Service project: Leave it default selected that is our project AnnotationWebService
Step 10: Move service slider all the way to the top to create and test service then click Next
Please note: We are not generating client and to test our service we will use eclipse in built Web Service Explorer. If you are interested to see how to generate client please use this link where we have generated java client from WSDL and test using Java client class and we service explorer.

Step 11: On end point configuration window Select Use a Service End Point Interface and Create SEI and give name CalculateInterface and this interface will be main client interaction point then select all three operation which we have created in our java class before and click Next

Step 13: Now select JAX-WS Annotations to add shown below annotate all three methods and click next:

This step is very important step please see below details about all annotation:
- @WebMethod: This customizes method which will be exposed as Web Service operation. Method should be public and also its parameters return value. Exceptions should follow rules of JAX-RPC 1.1
- @WebParam: This customizes mapping of individual parameter as Web Service message part and XML element
- @RequestWrapper: This use to annotate methods which is in Service Endpoint Interface by request wrapper bean which will be used at runtime. Default value of localName will be operation Name as you defined in WebMethod annotation and targetNamespace will be the target namespace of SEI. First When started from Java this annotation was used to resolve overloading conflicts in document literal mode. Only className will be required in this case.
- @ResponseWrapper: This use to annotate methods in Service Endpoint Interface which will be response wrapper bean that will be used at runtime. Default value of localName is operation Name defined in Web Method annotation appended by Response and target Namespace is target namespace of SEI. First when started from Java this annotation was used resolve overloading conflicts in document literal mode. Only className will be required in this case.
- @WebResult: This customize mapping of return value to WSDL part and XML element
Step 14: On Configure the Apache CXF Java to WS options: Select as below and click Next:

Step 15: Start serve Window –> Click start to start the server:

Step 16: Once server started successfully click Next

Step 17: On next window click next

Step 18: Finally click finish then you will see Web Service Window opens automatically to test web service shown below:

Step 19: For example to calculate sum of two number click calculateSum this will open input window enter number in input field then press Go:

- Final project structure:
- CalculateInterface created by JAX-WS
package com.javahonk;

import javax.jws.WebMethod;
import javax.jws.WebParam;
import javax.jws.WebResult;
import javax.jws.WebService;
import javax.xml.ws.RequestWrapper;
import javax.xml.ws.ResponseWrapper;

@WebService(name = "CalculateInterface", targetNamespace = "http://techiworks.com/")
public interface CalculateInterface {

    @WebMethod(operationName = "calculateSum", action = "urn:CalculateSum")
    @RequestWrapper(className = "com.javahonk.jaxws.CalculateSum", localName = "calculateSum", targetNamespace = "http://techiworks.com/")
    @ResponseWrapper(className = "com.javahonk.jaxws.CalculateSumResponse", localName = "calculateSumResponse", targetNamespace = "http://techiworks.com/")
    @WebResult(name = "return")
    public Integer calculateSum(@WebParam(name = "arg0") int i, @WebParam(name = "arg1") int j);

    @WebMethod(operationName = "multiplyNumber", action = "urn:MultiplyNumber")
    @RequestWrapper(className = "com.javahonk.jaxws.MultiplyNumber", localName = "multiplyNumber", targetNamespace = "http://techiworks.com/")
    @ResponseWrapper(className = "com.javahonk.jaxws.MultiplyNumberResponse", localName = "multiplyNumberResponse", targetNamespace = "http://techiworks.com/")
    @WebResult(name = "return")
    public Integer multiplyNumber(@WebParam(name = "arg0") int i, @WebParam(name = "arg1") int j);

    @WebMethod(operationName = "divideNumber", action = "urn:DivideNumber")
    @RequestWrapper(className = "com.javahonk.jaxws.DivideNumber", localName = "divideNumber", targetNamespace = "http://techiworks.com/")
    @ResponseWrapper(className = "com.javahonk.jaxws.DivideNumberResponse", localName = "divideNumberResponse", targetNamespace = "http://techiworks.com/")
    @WebResult(name = "return")
    public Integer divideNumber(@WebParam(name = "arg0") int i, @WebParam(name = "arg1") int j);

}
- WSDL url: http://localhost:8080/CalculateWebService/services/CalculatePort?wsdl
- WSDL location: CalculateWebService\WebContent\wsdl\calculate.wsdl
- To find wsdl URL: Open calculate.wsdl search for soap:address you will see below
<soap:address location="http://localhost:8080/CalculateWebService/services/CalculatePort"/>
Add ?wsdl at the end of the URL:
http://localhost:8080/CalculateWebService/services/CalculatePort?wsdl
That’s it JAX-WS web service eclipse completed.
Don’t miss: Create JAX-WX web service client
![]() Download web service project : CalculateWebService
Download web service project : CalculateWebService

Very useful tutorial, I saw others but this fits exactly what I was looking, also is very well explained.
Only one detail: When configuring the CXF2, in Web Service, CXF 2.x Preference, Endpoint config, I had to change “Spring Application Context Use” to “Use CXF Servlet”. Thank very much.
hi bro,
how to deploy it on web server tomcat