This tutorial will show you how to save and retrieve image from database. This requirement is very common for any project when you will have to save and retrieve image from database .
If you are in design phase and trying to take decision on what would be best approach to save image either in database or disk please read this : Where to save image
Save and retrieve image from database below tools are needed:
- Eclipse ( We are using eclipse Kepler)
- MySQL data base (Install MySQL Community Server (GPL) version in your system : MySQL Community Server). We are using version 5.6 (If you would like step by step instruction to install MySQL on your server please read this: Install MySQL server
- mysql-connector-java-5.1.18-bin.jar (Already included in project that you could download in the bottom of the page)
Step 1: Create table in MySQL database. Please use below script:
CREATE TABLE imagetable (
	id        	int(11) NULL AUTO_INCREMENT ,
	image_data	mediumblob NULL,
	image_name	varchar(50) NULL,
	primary key (id)
	)
GO
Important note on blob data selection: We are using mediumblob as column in the data base because blob size is limited to 64kb only. Please read this store requirement tutorial from MySQL site to get complete idea : Data Type Storage Requirements
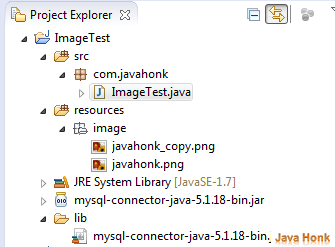
Step 2: Open your eclipse and create Java project name: ImageTest . Below is project structure:
Step 3: Right click on project and choose source folder and give folder name resources . In this folder we will keep our image which we save and retrieve from database.
Note: If you create resources folder as source folder eclipse automatically add this folder to the project class path and do not need to anything for setting the class path of this folder.
Step 4: You could choose any type of image for test we will use png image. Please right click and save below image to your resources/image folder.

Step 5: create folder name lib and put mysql-connector-java-5.1.18-bin.jar in it and include this jar in your class path (Right click project –> Build path –> Configure Build path –> Libraries tab –> Add jar from your lib foler)
Step 5: Create package name com.javahonk then create class name: ImageTest.java copy paste below code:
package com.javahonk;

import java.awt.image.BufferedImage;
import java.io.ByteArrayOutputStream;
import java.io.File;
import java.io.FileOutputStream;
import java.sql.Connection;
import java.sql.DriverManager;
import java.sql.PreparedStatement;
import java.sql.ResultSet;
import java.sql.Statement;

import javax.imageio.ImageIO;

public class ImageTest {

public static void main(String[] args) {

	ByteArrayOutputStream baos = null;
	PreparedStatement preparedStatement = null;
	Connection connection = null;
	Statement statement = null;
	ResultSet resultSet = null;
	FileOutputStream fileOuputStream = null;

try {

	BufferedImage originalImage = ImageIO.read(new File(
			"resources/image/javahonk.png"));

	baos = new ByteArrayOutputStream();
	ImageIO.write(originalImage, "jpg", baos);
	baos.flush();
	byte[] imageInByte = baos.toByteArray();

	connection = getDatabaseConnection();
	String insertImageSql = "INSERT INTO "
			+ "imagetable(image_data, image_name)"
			+ " VALUES(?,?)";
	preparedStatement = connection.prepareStatement(insertImageSql);
	preparedStatement.setBytes(1, imageInByte);
	preparedStatement.setString(2, "Java Honk");

	preparedStatement.executeUpdate();

	statement = connection.createStatement();
	resultSet = statement.executeQuery("SELECT * FROM imagetable");

	System.out.println("Image sucessfully inserted to the table");

	String imageName = "";
	byte[] image = null;
	int id = 0;

	while (resultSet.next()) {
		id = resultSet.getInt(1);
		image = resultSet.getBytes(2);
		imageName = resultSet.getString(3);

	}

	// convert array of bytes into modified file again
	fileOuputStream = new FileOutputStream(
			"resources/image/javahonk_copy.png");
	fileOuputStream.write(image);

	System.out
			.println("\nImage successully retrieved "
					+ "from database. Id of image:"
					+ id + " Image name: " + imageName);

} catch (Exception e) {
	System.out.println("Failed to make connection!" + e);
} finally {

	try {
		if (baos != null) {
			baos.close();
		}
		if (preparedStatement != null) {
			preparedStatement.close();
		}
		if (connection != null) {
			connection.close();
		}
		if (statement != null) {
			statement.close();
		}
		if (resultSet != null) {
			resultSet.close();
		}
		if (fileOuputStream != null) {
			fileOuputStream.close();
		}
	} catch (Exception e2) {
		e2.printStackTrace();
	}
}

}

// Static method to get connection object
public static Connection getDatabaseConnection() {

	Connection connection = null;
	try {

		Class.forName("com.mysql.jdbc.Driver");
		connection = DriverManager.getConnection(
				"jdbc:mysql://localhost:3306/javahonk",
				"root", "admin");
	} catch (Exception e) {
		System.out.println("Failed to make connection!" + e);
	}
	return connection;
}
}
Note: In above java class we are usign MySQL database please don’t forget to replace URL and user name and password with your configuration.
Step 6 : Now we are all set to run this project. To run Right click ImageTest.java –> Run As –> Java Application then you will see below successful message on console.

Step 7: Below records inserted into database:

Step 8 : Now refresh your resources folder you will one more image name: javahonk_copy.png created again from database. Double click to open this image as you will see it’s same what we had saved in the database.
Step 9: That’s it for save and retrieve image from database .
![]() Download project source code: Save and retrieve image from database
Download project source code: Save and retrieve image from database
