Spring declarative transaction management Annotation based
All other spring transaction tutorials:
- Spring declarative transaction management XML based
- Spring programmatic transaction using TransactionTemplate
- Spring Programmatic Transactions by PlatformTransactionManager
Spring declarative transaction management can be achieve using two ways shown below:
- Using XML based transactional advice and AOP configuration – This we already discussed in our previous tutorial here
- By using @Transactional annotation – Today we will discuss about annotation based transaction.
Compare to XML-based declarative approach to achieve transaction, you could also use annotation based approach. Here there is very minimal configuration in XML file which will see later in the example and most part of transaction semantics define directly to the java code. Advantage of this is the declaration is closer on the affected code and less danger of undue coupling and any time you could change your approach which will be affected to method only.
You will find how easy the use of @transactional annotation to achieve transaction. Let’s start with example to understand better.
Below are needed to run this example:
- Eclipse ( We are using eclipse Kepler. You could also download eclipse from eclipse.org/downloads)
- MySQL data base (Install MySQL Community Server (GPL) version in your system : MySQL Community Server). We are using version 5.6 ( If you are not sure how to install it please use this link : Install MySQL server )
- Maven 3.0.4
Below are steps:
Step 1. Create table to MySQL database: Please use below script to create table and insert sample data for test to the MySQL database:
DROP TABLE person
GO

CREATE TABLE person (
    id int NOT NULL AUTO_INCREMENT,
    First_Name  varchar(25) NULL,
    Last_Name   varchar(25) NULL,
    Street_Name varchar(25) NULL,
    City        varchar(25) NULL,
    State       varchar(25) NULL,
    Country     varchar(25) NULL,
    PRIMARY KEY (id)
    )
GO
Step 2: Create dynamic web project in eclipse name: SpringDeclarativeTransactionAnnotaion (Please use this link if you are not sure how to create maven project in eclipse: Create maven project in eclipse) . Maven project structure:

Step 3: Create Spring/resources folder inside src/main/resources. Now lets create application-config.xml to complete our XML file configuration. See below copy paste below code in your application-config.xml file
<?xml version="1.0" encoding="UTF-8"?>

<beans xmlns="http://www.springframework.org/schema/beans"
    xmlns:xsi="http://www.w3.org/2001/XMLSchema-instance"
    xmlns:context="http://www.springframework.org/schema/context"
    xmlns:tx="http://www.springframework.org/schema/tx"
    xmlns:aop="http://www.springframework.org/schema/aop"
    xsi:schemaLocation="http://www.springframework.org/schema/beans
    http://www.springframework.org/schema/beans/spring-beans.xsd
    http://www.springframework.org/schema/tx http://www.springframework.org/schema/tx/spring-tx-2.5.xsd
    http://www.springframework.org/schema/aop http://www.springframework.org/schema/aop/spring-aop-2.5.xsd
    http://www.springframework.org/schema/context http://www.springframework.org/schema/context/spring-context.xsd">

<!-- Spring will start reading @transactional annotation in another
words we are activating annotation based transaction here using
below tag -->
<context:annotation-config/>

<!-- Adds transactional scope and wraps code in transaction semantics
automatically  -->
<tx:annotation-driven  transaction-manager="transactionManager"/>

<!-- PlatformTransactionManager which are going to drive transaction-->
<bean id="transactionManager" class="org.springframework.jdbc.datasource.DataSourceTransactionManager">
  <property name="dataSource" ref="dataSource"></property>
</bean>

<!-- DataSource to connect mysql database -->
<bean id="dataSource" class="org.springframework.jdbc.datasource.DriverManagerDataSource">
    <property name="driverClassName" value="com.mysql.jdbc.Driver"></property>
    <property name="url" value="jdbc:mysql://localhost:3306/JavaHonk"></property>
    <property name="username" value="root"></property>
    <property name="password" value="admin"></property>
</bean>

<!-- JdbcTemplate bean to execute query-->
 <bean id="jdbcTemplate" class="org.springframework.jdbc.core.JdbcTemplate">
    <property name="dataSource" ref="dataSource"></property>
 </bean>

<!-- Our main DAO class bean object which we are making transactional -->
 <bean id="personDAO" class="com.javahonk.dao.PersonDAO">
    <property name="jdbcTemplate" ref="jdbcTemplate"></property>
 </bean>


</beans>
Lets take one by one each bean defined in above XML file:
- Below will tell spring to start reading @transactional annotation in the class in another words we are activating annotation based transaction context by using this:
<context:annotation-config/>
- tx:annotation-driven: This adds transactional scope and wraps transaction support to all code wherever @transaction defined on class level
<tx:annotation-driven transaction-manager="transactionManager"/>
- Heart of transaction: PlatformTransactionManager which are going to drive transaction
<bean id="transactionManager" class="org.springframework.jdbc.datasource.DataSourceTransactionManager">
  <property name="dataSource" ref="dataSource"></property>
</bean>
- Data base and its property configuration. Don’t forget to change data base URL and user id password with your configuration.
<bean id="dataSource" class="org.springframework.jdbc.datasource.DriverManagerDataSource">
    <property name="driverClassName" value="com.mysql.jdbc.Driver"></property>
    <property name="url" value="jdbc:mysql://localhost:3306/JavaHonk"></property>
    <property name="username" value="root"></property>
    <property name="password" value="admin"></property>
</bean>
- We are using JdbcTemplate to execute query below configuration will activate JdbcTemplate API and will be available to use in our code.
<bean id="jdbcTemplate" class="org.springframework.jdbc.core.JdbcTemplate">
    <property name="dataSource" ref="dataSource"></property>
 </bean>
- Last configuration our PersonDAO class bean instantiation which is wire with JdbcTemplate so that we can use it in our code.
<bean id="personDAO" class="com.javahonk.dao.PersonDAO">
    <property name="jdbcTemplate" ref="jdbcTemplate"></property>
 </bean>
Step 4: Create three package inside src folder
- com.javahonk
- com.javahonk.dao
- com.javahonk.di.bean
Step 5: Create interface IPersonDAO inside com.javahonk.dao package. This will be our service interface and we will make all method of this interface transactional. Please copy paste below code:
package com.javahonk.dao;

import com.javahonk.di.bean.Person;

public interface IPersonDAO {
    int insertUser(Person person);
    void deletePerson(int personID);
    void selectAllPerson();
    void selectPersonByName();

}
Step 6: Create implementation of above interface and where we will implement all of its method and provide details implementation of transaction. Create class PersonDAO implements IPersonDAO inside com.javahonk.dao package
Please note: PersonDAO class uses @Transactional annotation on class level which tell spring to wrap up this class in transactional scope. Below are @Transactional annotation based properties list which you can use to change default behavior of transaction level (default is readOnly =fasle means you could perform all CRUD operation to the database) to control transaction and communicate with other transaction:
| Property | Type | Description |
| readOnly | boolean | read-only or Read/write transaction |
| timeout | int (time in seconds) | Define transaction timeout |
| isolation | enum: Isolation levle | This is optional isolation level |
| rollbackFor | Derive any class from Throwable class rollback transaction in case of exception. | Optional array of defined exception classes that will cause rollback |
| rollbackForClassname | Define array of class names and this must be derived from Throwable. | Optional: Array of exception classes that will cause rollback |
| noRollbackFor | Define array of class names that must be must be derived from Throwable. | Optional: Array of exception classes that will not cause rollback |
| noRollbackForClassname | Define array of class names that must be must be derived from Throwable. | Optional: Array of exception classes that will not cause rollback |
| value | String value | Optional: It is qualifier specifying transaction manager will be used |
| propagation | enum: Propagation level | Optional: propagation setting |
We have overridden transaction default behavior for only select method and made @Transactional(readOnly = true) means its enable for only read operation and remaining other method are using default transactional leve readOnly=false mean it can perform all CRUD operation. Spring rollback any transaction for RuntimeException or unchecked exceptions. Method selectPersonByName() throws UnsupportedOperationException to test roll back as you will see on console output just for test if its transaction enabled. Please have code below:
package com.javahonk.dao;

import java.sql.Types;
import java.util.Iterator;
import java.util.List;
import java.util.Map;

import org.springframework.jdbc.core.JdbcTemplate;
import org.springframework.transaction.annotation.Transactional;

import com.javahonk.di.bean.Person;

@Transactional
public class PersonDAO implements IPersonDAO {

    private JdbcTemplate jdbcTemplate;

    @Override
    public int insertUser(Person person) {
    String inserQuery = "INSERT INTO person(First_Name, "
        + "Last_Name, Street_Name, City, State, Country) "
        + "VALUES(?, ?, ?, ?, ?, ?)";
    Object[] params = new Object[] { person.getFirstName(),
        person.getLastName(),
        person.getStreet(),person.getCity(),person.getState(),
        person.getCountry()};
    int[] types = new int[] { Types.VARCHAR, Types.VARCHAR,
        Types.VARCHAR, Types.VARCHAR, Types.VARCHAR,
        Types.VARCHAR
        };
    int value = jdbcTemplate.update(inserQuery, params, types);
    System.out.println("\nPerson inserted to the table");
    return value;
    }

    @Override
    public void deletePerson(int personID) {

    String deletePerson = "DELETE FROM person WHERE id =?";
    Object[] params = new Object[] { personID};
    int[] types = new int[] { Types.VARCHAR};
    jdbcTemplate.update(deletePerson, params, types);
    System.out.println("\nPerson with id 1 deleted from "
        + "the table\n");

    }

    @Override
    @Transactional(readOnly = true)
    public void selectAllPerson() {

    System.out.println("\nList of person in the table\n");

    String selectAllPerson = "SELECT * FROM person";
    List<Map<String, Object>> listOfPerson = jdbcTemplate
        .queryForList(selectAllPerson);
    for (Iterator<Map<String, Object>> iterator =
        listOfPerson.iterator(); iterator.hasNext();) {
        Map<String, Object> map = (Map<String, Object>)
            iterator.next();
        System.out.println(map);
    }
    System.out.println();

    }

    @Override
    @Transactional(readOnly = true)
    public void selectPersonByName() {
    throw new UnsupportedOperationException();

    }

    public JdbcTemplate getJdbcTemplate() {
    return jdbcTemplate;
    }

    public void setJdbcTemplate(JdbcTemplate jdbcTemplate) {
    this.jdbcTemplate = jdbcTemplate;
    }


}
Step 7: Now create Person.java bean class which act as business object inside package com.javahonk.di.bean and copy paste below code:
package com.javahonk.di.bean;

import java.io.Serializable;

public class Person implements Serializable{

    private static final long serialVersionUID = 1L;
    private String FirstName;
    private String LastName;
    private String street;
    private String city;
    private String state;
    private String country;


    public Person(String firstName, String lastName, String street,
        String city, String state, String country) {
    super();
    FirstName = firstName;
    LastName = lastName;
    this.street = street;
    this.city = city;
    this.state = state;
    this.country = country;
    }

    public String getFirstName() {
        return FirstName;
    }
    public void setFirstName(String firstName) {
        FirstName = firstName;
    }
    public String getLastName() {
        return LastName;
    }
    public void setLastName(String lastName) {
        LastName = lastName;
    }
    public String getStreet() {
        return street;
    }
    public void setStreet(String street) {
        this.street = street;
    }
    public String getCity() {
        return city;
    }
    public void setCity(String city) {
        this.city = city;
    }
    public String getState() {
        return state;
    }
    public void setState(String state) {
        this.state = state;
    }

    public String getCountry() {
        return country;
    }

    public void setCountry(String country) {
        this.country = country;
    }


}
Step 8: Please add below dependencies in pom.xml
<project xmlns="http://maven.apache.org/POM/4.0.0" xmlns:xsi="http://www.w3.org/2001/XMLSchema-instance" xsi:schemaLocation="http://maven.apache.org/POM/4.0.0 http://maven.apache.org/xsd/maven-4.0.0.xsd">
  <modelVersion>4.0.0</modelVersion>
  <groupId>org.springframework.samples.service.service</groupId>
  <artifactId>SpringMaven</artifactId>
  <version>0.0.1-SNAPSHOT</version>
  <packaging>war</packaging>


    <dependencies>

        <!-- Spring and Transactions -->
        <dependency>
            <groupId>org.springframework</groupId>
            <artifactId>spring-jdbc</artifactId>
            <version>3.0.3.RELEASE</version>
        </dependency>

        <!-- MySql 5.5 Connector -->
        <dependency>
            <groupId>mysql</groupId>
            <artifactId>mysql-connector-java</artifactId>
            <version>5.1.29</version>
        </dependency>

        <dependency>
            <groupId>org.aspectj</groupId>
            <artifactId>aspectjweaver</artifactId>
            <version>1.7.4</version>
        </dependency>


    </dependencies>
</project>
Step 9: Maven project create logger file automatically but in case it’s not created then create logback.xml inside src\main\resources folder and copy paste below code in it:
<?xml version="1.0" encoding="UTF-8"?>
<!-- configuration file for LogBack (slf4J implementation)
See here for more details: http://gordondickens.com/wordpress/2013/03/27/sawing-through-the-java-loggers/ -->
<configuration scan="true" scanPeriod="30 seconds">

    <contextListener class="ch.qos.logback.classic.jul.LevelChangePropagator">
        <resetJUL>true</resetJUL>
    </contextListener>

    <!-- To enable JMX Management -
    <jmxConfigurator/>

    <appender name="console" class="ch.qos.logback.core.ConsoleAppender">
        <encoder>
            <pattern>%-5level %logger{0} - %msg%n</pattern>
        </encoder>
    </appender>

    <!--<logger name="org.hibernate" level="debug"/> -->
   <!-- Uncomment and add your logger here:
    <logger name="org.springframework.samples.service.service" level="debug"/> -->

    <root level="info">
        <appender-ref ref="console"/>
    </root>
</configuration>
Step 10: Our all configuration is completed lastly create main class to test it. Create main class name: TestSpringJDBCTemplate.java inside com.javahonk package and copy paste below content in it:
package com.javahonk;

import org.springframework.context.support.ClassPathXmlApplicationContext;

import com.javahonk.dao.IPersonDAO;
import com.javahonk.di.bean.Person;

public class TestSpringJDBCTemplate {

    public static void main(String[] args) {

    ClassPathXmlApplicationContext applicationContext =
        new ClassPathXmlApplicationContext(
            "spring\\application-config.xml");

    IPersonDAO personDAO = applicationContext.
        getBean("personDAO", IPersonDAO.class);
    Person person = new Person("Java", "Honk",
        "John st.","NY", "NY", "USA");

    //Insert user to the table 3 times:
    for (int i = 0; i < 3; i++) {
        personDAO.insertUser(person);
    }

    //Delete first person from table
    personDAO.deletePerson(1);

    //Select all inserted user from the table
    personDAO.selectAllPerson();


    //Below method we are throwing exception intentionally
    //to check if transaction enabled
    personDAO.selectPersonByName();


    applicationContext.close();

    }

}
Step 11: Our final project structure will look as below:

Step 12: Let’s test it. Right click main class TestSpringJDBCTemplate.java –> Run As –> Java Application. You will see record inserted deleted selected and throws exception on the console below:

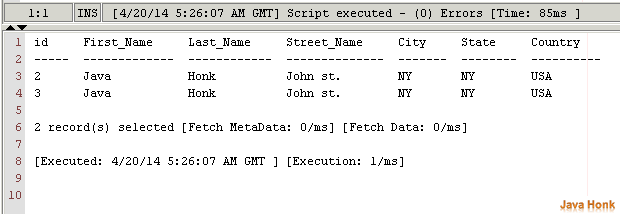
Step 13: Data in the table:

- That’s it Spring declarative transaction management Annotation based completed successfully.
![]() Download source code : Spring DeclarativeTransaction Annotaion based
Download source code : Spring DeclarativeTransaction Annotaion based

Dude, whoever you , THANK YOU SO MUCH GOD BLESS YOU for sharing this.