Spring MVC Upload Multiple File
This demo will show you how to upload multiple file using spring mvc framework. We will upload three file type and write it to local drive.
- PNG
- JPG
Below are needed:
- Eclipse 3.0 or above (Download from here)
- JDK 1.6 or above (Download from here )
- Tomcat 6 or above (Please follow link to install and configure tomcat in eclipse: Configure and Run Tomcat server in eclipse )
- Maven 3.0.4
Steps:
- Create maven project SpringFileUpload eclipse (Please use this link if you are not familiar how to create maven project in eclipse: Create maven Project Eclipse)
- Below shows final project structure:
- Please add below dependency in pom.xml file:
<project xmlns="http://maven.apache.org/POM/4.0.0" xmlns:xsi="http://www.w3.org/2001/XMLSchema-instance"
    xsi:schemaLocation="http://maven.apache.org/POM/4.0.0 http://maven.apache.org/maven-v4_0_0.xsd">
    <modelVersion>4.0.0</modelVersion>
    <groupId>com.javahonk</groupId>
    <artifactId>SpringFileUpload</artifactId>
    <packaging>war</packaging>
    <version>0.0.1-SNAPSHOT</version>
    <name>SpringFileUpload Maven Webapp</name>
    <url>http://maven.apache.org</url>
    <properties>
        <spring.version>4.0.3.RELEASE</spring.version>
    </properties>
    <dependencies>

        <dependency>
            <groupId>org.springframework</groupId>
            <artifactId>spring-core</artifactId>
            <version>${spring.version}</version>
        </dependency>

        <dependency>
            <groupId>org.springframework</groupId>
            <artifactId>spring-web</artifactId>
            <version>${spring.version}</version>
        </dependency>

        <dependency>
            <groupId>org.springframework</groupId>
            <artifactId>spring-webmvc</artifactId>
            <version>${spring.version}</version>
        </dependency>

        <dependency>
            <groupId>commons-fileupload</groupId>
            <artifactId>commons-fileupload</artifactId>
            <version>1.3.1</version>
        </dependency>

        <dependency>
            <groupId>org.apache.commons</groupId>
            <artifactId>commons-io</artifactId>
            <version>1.3.2</version>
        </dependency>

    </dependencies>
    <build>
        <finalName>SpringFileUpload</finalName>
    </build>
</project>
- Please copy below XML into your web.xml file
<web-app xmlns="http://java.sun.com/xml/ns/javaee" xmlns:xsi="http://www.w3.org/2001/XMLSchema-instance"
    xsi:schemaLocation="http://java.sun.com/xml/ns/javaee
          http://java.sun.com/xml/ns/javaee/web-app_3_0.xsd"
    version="3.0">
    <display-name>Servlet 3.0 Web Application</display-name>
    <servlet>
        <servlet-name>dispatcher</servlet-name>
        <servlet-class>org.springframework.web.servlet.DispatcherServlet</servlet-class>
        <load-on-startup>1</load-on-startup>
    </servlet>

    <servlet-mapping>
        <servlet-name>dispatcher</servlet-name>
        <url-pattern>*.web</url-pattern>
    </servlet-mapping>

    <context-param>
        <param-name>contextConfigLocation</param-name>
        <param-value>/WEB-INF/dispatcher-servlet.xml</param-value>
    </context-param>

    <listener>
        <listener-class>org.springframework.web.context.ContextLoaderListener</listener-class>
    </listener>

    <welcome-file-list>
        <welcome-file>helloWorld.web</welcome-file>
    </welcome-file-list>
</web-app>
- Now create file name: dispatcher-servlet.xml inside WEB-INF folder and copy and paste below content
<?xml  version="1.0" encoding="UTF-8"?>
<beans xmlns="http://www.springframework.org/schema/beans"
    xmlns:xsi="http://www.w3.org/2001/XMLSchema-instance"
    xmlns:context="http://www.springframework.org/schema/context"
    xmlns:mvc="http://www.springframework.org/schema/mvc"
    xsi:schemaLocation="http://www.springframework.org/schema/beans http://www.springframework.org/schema/beans/spring-beans.xsd
        http://www.springframework.org/schema/context http://www.springframework.org/schema/context/spring-context.xsd
        http://www.springframework.org/schema/mvc http://www.springframework.org/schema/mvc/spring-mvc.xsd">


    <context:component-scan base-package="com.javahonk.controller" />

    <context:annotation-config />

    <bean id="multipartResolver" class="org.springframework.web.multipart.commons.CommonsMultipartResolver">
        <property name="maxUploadSize" value="7000000" />
    </bean>


    <bean
        class="org.springframework.web.servlet.view.InternalResourceViewResolver">
        <property name="prefix">
            <value>/WEB-INF/jsp/</value>
        </property>
        <property name="suffix">
            <value>.jsp</value>
        </property>
    </bean>

</beans>
- Please note: Below tag property name maxUploadSize added to set max upload file size. You could increase or decrease based on your requirement.
<bean id="multipartResolver" class="org.springframework.web.multipart.commons.CommonsMultipartResolver">
        <property name="maxUploadSize" value="7000000" />
</bean>
- Create jsp folder inside WEB-INF folder
- Create jsp file name: helloWorld.jsp and copy paste below code inside jsp folder:
<%@taglib uri="http://www.springframework.org/tags/form" prefix="form"%>
<html>
<head>
<title>Spring MVC Multiple File Upload</title>
<script
    src="https://code.jquery.com/jquery-2.1.1.min.js"></script>
<script>
$(document).ready(function() {
    $('#addMoreFile').click(function() {
        $('#uploadTable').append(
                '<tr><td><input type="file" name="multiUploadedFileList['+ $('#uploadTable tr').length +']" />'+
                '</td></tr>');
    });

});
</script>
</head>
<body>
    <h1>${message}</h1>
    <form:form method="post" action="multiFileUpload.web"
        commandName="multiFileUpload" enctype="multipart/form-data">

        <h3>Click Add More Files button to add files</h3>
        <input id="addMoreFile" type="button" value="Add More Files" /><br /><br />
        <table id="uploadTable" border="2">
            <tr>
                <td><input name="multiUploadedFileList[0]" type="file" /></td>
            </tr>
        </table>
        <br />
        <input type="submit" value="Upload Files" />
    </form:form>
</body>
</html>
- Create jsp file name: Upload.jsp and copy paste below code inside jsp folder:
<%@taglib uri="http://www.springframework.org/tags/form" prefix="form"%>
<html>
<head>
<title>Spring MVC Multiple File Upload</title>
</head>
<body>
    <h1>${message}</h1>
</body>
</html>
- Create package name com.javahonk.controller inside src/main/java folder
- Create class name: MultiFileUpload.java inside com.javahonk.controller pakcage and copy paste below content in it:
package com.javahonk.controller;

import java.util.List;

import org.springframework.web.multipart.MultipartFile;

public class MultiFileUpload {

    private List<MultipartFile> multiUploadedFileList;

    public List<MultipartFile> getMultiUploadedFileList() {
        return multiUploadedFileList;
    }

    public void setMultiUploadedFileList(List<MultipartFile>
                multiUploadedFileList) {
        this.multiUploadedFileList = multiUploadedFileList;
    }


}
- Create class name: UploadController.java inside com.javahonk.controller pakcage and copy paste below content in it:
package com.javahonk.controller;

import java.awt.image.BufferedImage;
import java.io.ByteArrayOutputStream;
import java.io.File;
import java.io.FileOutputStream;
import java.io.IOException;
import java.io.InputStream;
import java.util.List;

import javax.imageio.ImageIO;
import javax.servlet.http.HttpServletRequest;
import javax.servlet.http.HttpServletResponse;

import org.apache.commons.io.IOUtils;
import org.springframework.stereotype.Controller;
import org.springframework.ui.Model;
import org.springframework.ui.ModelMap;
import org.springframework.validation.BindingResult;
import org.springframework.web.bind.annotation.ModelAttribute;
import org.springframework.web.bind.annotation.RequestMapping;
import org.springframework.web.bind.annotation.RequestMethod;
import org.springframework.web.multipart.MultipartFile;

@Controller
public class UploadController {
    @RequestMapping(value = "/helloWorld.web",
        method = RequestMethod.GET)
    public String printWelcome(ModelMap model, HttpServletRequest
        request, HttpServletResponse response) {

    model.addAttribute("message", "Spring MVC Multi File upload");
    return "helloWorld";

    }

    @RequestMapping(value = "/multiFileUpload.web",
        method = RequestMethod.POST)
    public String save(@ModelAttribute("multiFileUpload")
    MultiFileUpload multiFileUpload,BindingResult bindingResult, Model model) throws IOException {

    List<MultipartFile> files = multiFileUpload
        .getMultiUploadedFileList();
    StringBuffer uploadedfile =
        new StringBuffer("Below files uploaded successfully");

    if (files.isEmpty() ) {
        bindingResult.reject("noFile", "Please select file to upload");
        return "helloWorld";
    }

    if (null != files && files.size() > 0) {


        for (MultipartFile multipartFile : files) {

        ByteArrayOutputStream baos =
            new ByteArrayOutputStream();
        FileOutputStream output = null;
        File outputfile = null;
        String fileName = multipartFile.getOriginalFilename();
        uploadedfile.append("<h4>"+fileName+"</h4>");
        String extensionOfFileName = fileName.
            substring(fileName.indexOf(".")+1,
                fileName.length());
        outputfile = new File("C:\\Image\\" + fileName);
        InputStream inputStream = multipartFile
            .getInputStream();

        if (null!=extensionOfFileName &&
            extensionOfFileName.equalsIgnoreCase("pdf")) {
            if (!outputfile.isDirectory()) {
            try {
                output = new FileOutputStream(outputfile);
                IOUtils.copy(inputStream, output);
            } catch (Exception e) {
                e.printStackTrace();
            } finally {
                baos.close();
                output.close();

            }
            }
        } else if (null != extensionOfFileName
            && extensionOfFileName
            .equalsIgnoreCase("png")) {
            BufferedImage imBuff = ImageIO.read(multipartFile
                .getInputStream());
            ImageIO.write(imBuff, extensionOfFileName,
                outputfile);
        } else if (null != extensionOfFileName
            && extensionOfFileName
            .equalsIgnoreCase("jpg")) {
            BufferedImage imBuff = ImageIO
                .read(multipartFile.getInputStream());
            ImageIO.write(imBuff, extensionOfFileName,
                outputfile);
        }else {
            System.out.println("Unknown file extension"
        +extensionOfFileName);
        }

        }
    }

    model.addAttribute("message", uploadedfile);
    return "Upload";
    }

}
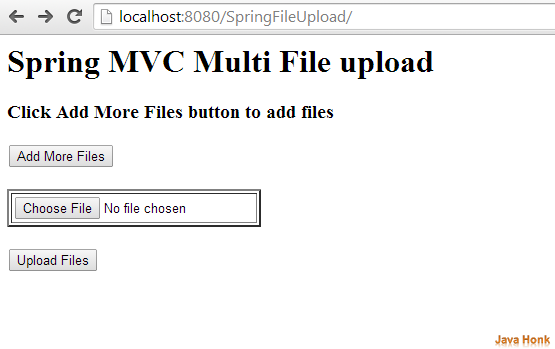
- Now lets run application. If you haven’t done tomcat set up in eclipse yet please use this link: Configure and Run Tomcat server in eclipse. Now right click project –>Run As –> Run on server you will see below screen with below buttons:
- Add More Files – To Add more files to upload
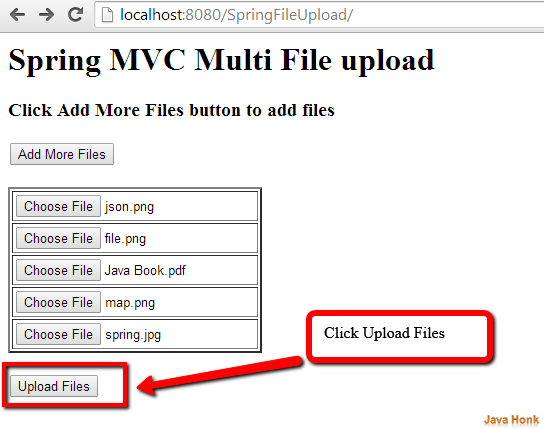
- Choose File – It will open up browse pop-up to choose file to upload
- Upload Files – One file chosen then click this button to upload
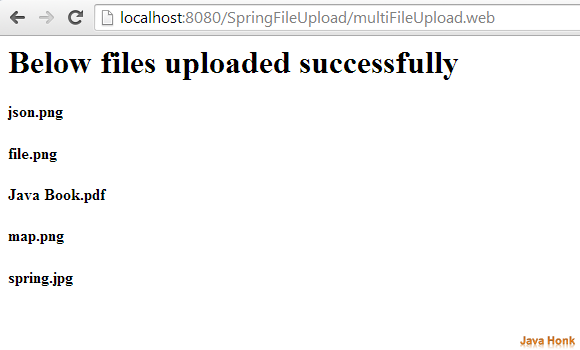
- Once you click Upload Files button – File will be uploaded on local drive (Please note: We are uploading three files type: PDF,JPG AND PNG) and you will see below result screen:
![]() Download Project: SpringFileUpload
Download Project: SpringFileUpload
That’s it Spring MVC Upload Multiple File


