Display Tag Spring Pagination
To implement pagination on web application there are many libraries are available which we can use to achieve pagination. Out of many pagination libraries display tag library is quite famous which can provide many functionality and very easy to use. Display tag library is open source which is bundled with custom tags which provide very high level web presentation patterns and be implementing in any MVC model web application.
In this demo we will show you how to achieve pagination using display tag on spring MVC application.
Below are needed:
- Eclipse 3.2 or above (Download from here) – Note for this demo we have use eclipse kepler
- JDK 1.6 or above (Download from here )
- Tomcat 6 or above (Please follow link to install and configure tomcat in eclipse: Configure and Run Tomcat server in eclipse )
- Spring jars which is already included in project for download in the bottom
- Display tag jars is already included in project for download in the bottom ( You could also download from Display tag site here)
After all set up and configuration you will see below screen:
- Create dynamic web project in eclipse name: SpringDisplayTagPagination (Please use this link if you are not familiar how to create dynamic project in eclipse: Create Dynamic Web Project Eclipse)
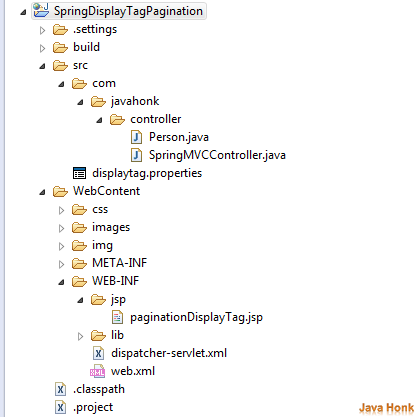
- Below shows project structure:
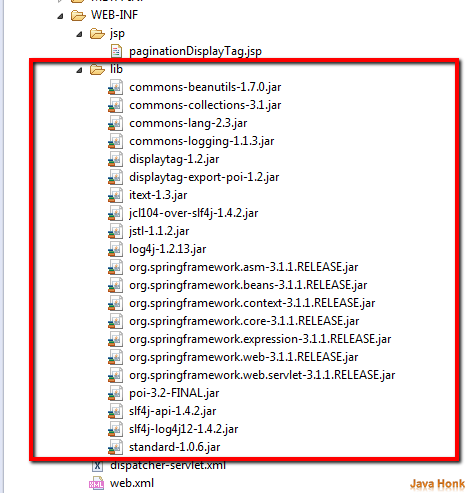
- Lib folder in project
- Please copy below XML into your web.xml file
<?xml version="1.0" encoding="UTF-8"?>
<web-app xmlns:xsi="http://www.w3.org/2001/XMLSchema-instance"
xmlns="http://java.sun.com/xml/ns/javaee"
xsi:schemaLocation="http://java.sun.com/xml/ns/javaee http://java.sun.com/xml/ns/javaee/web-app_2_5.xsd" id="WebApp_ID" version="2.5">

  <display-name>SpringDisplayTagPagination</display-name>
  <welcome-file-list>
    <welcome-file>paginationDisplayTag.web</welcome-file>
  </welcome-file-list>

  <servlet>
        <servlet-name>dispatcher</servlet-name>
        <servlet-class>org.springframework.web.servlet.DispatcherServlet</servlet-class>
        <load-on-startup>1</load-on-startup>
    </servlet>

    <servlet-mapping>
        <servlet-name>dispatcher</servlet-name>
        <url-pattern>*.web</url-pattern>
    </servlet-mapping>

    <context-param>
        <param-name>contextConfigLocation</param-name>
        <param-value>/WEB-INF/dispatcher-servlet.xml</param-value>
    </context-param>

    <listener>
        <listener-class>org.springframework.web.context.ContextLoaderListener</listener-class>
    </listener>

</web-app>
- Now create file name: dispatcher-servlet.xml inside WEB-INF folder and copy and paste below content
<beans xmlns="http://www.springframework.org/schema/beans"
    xmlns:context="http://www.springframework.org/schema/context"
    xmlns:xsi="http://www.w3.org/2001/XMLSchema-instance"
    xsi:schemaLocation="
        http://www.springframework.org/schema/beans
        http://www.springframework.org/schema/beans/spring-beans-3.0.xsd
        http://www.springframework.org/schema/context
        http://www.springframework.org/schema/context/spring-context-3.0.xsd">

    <context:component-scan base-package="com.javahonk.controller" />

    <bean
        class="org.springframework.web.servlet.view.InternalResourceViewResolver">
        <property name="prefix">
            <value>/WEB-INF/jsp/</value>
        </property>
        <property name="suffix">
            <value>.jsp</value>
        </property>
    </bean>

</beans>
- Create package name com.javahonk.controller inside src folder
- Create class name: SpringMVCController.java inside com.javahonk.controller pakcage and copy paste below content in it
package com.javahonk.controller;

import java.util.ArrayList;
import java.util.List;

import javax.servlet.http.HttpServletRequest;
import javax.servlet.http.HttpServletResponse;

import org.springframework.stereotype.Controller;
import org.springframework.ui.ModelMap;
import org.springframework.validation.BindingResult;
import org.springframework.web.bind.annotation.ModelAttribute;
import org.springframework.web.bind.annotation.RequestMapping;
import org.springframework.web.bind.annotation.RequestMethod;

@Controller
public class SpringMVCController {

    @RequestMapping(value = "/paginationDisplayTag.web", method =
            RequestMethod.GET)
    public String printWelcome(@ModelAttribute("person")
    Person person,BindingResult result, ModelMap model,
    HttpServletRequest request,
            HttpServletResponse response) {

    List<Person> personsList = new ArrayList<Person>();
        for (int i = 0; i < 25; i++) {
            Person person2 = new Person();
            person2.setName("John Landy");
            person2.setPosition("System Architect");
            person2.setSalary("$320,800");
            person2.setLocation("NY");
            person2.setPhone("999999999");
            personsList.add(person2);

            person2 = new Person();
            person2.setName("Igor Chunky");
            person2.setPosition("Solution Architect");
            person2.setSalary("$340,800");
            person2.setLocation("NY");
            person2.setPhone("987897899");
            personsList.add(person2);

            person2 = new Person();
            person2.setName("Manish Malhotra");
            person2.setPosition("Sr. Solution Architect");
            person2.setSalary("$380,800");
            person2.setLocation("CT");
            person2.setPhone("1234567890");
            personsList.add(person2);

            person2 = new Person();
            person2.setName("Ramesh Sikka");
            person2.setPosition("Sr. Architect");
            person2.setSalary("$310,800");
            person2.setLocation("CA");
            person2.setPhone("4654321234");
            personsList.add(person2);

            person2 = new Person();
            person2.setName("Bob Sidebottom");
            person2.setPosition("Architect");
            person2.setSalary("$300,800");
            person2.setLocation("NJ");
            person2.setPhone("9876543212");
    }

        person.setPersonList(personsList);
        return "paginationDisplayTag";

    }


}
- Create class name: Person.java inside com.javahonk.controller pakcage and copy paste below content in it
package com.javahonk.controller;

import java.util.List;

public class Person {

    private String name;
    private String position;
    private String salary;
    private String location;
    private String phone;

    private List<Person> personList;

    public String getName() {
        return name;
    }

    public void setName(String name) {
        this.name = name;
    }

    public String getPosition() {
        return position;
    }

    public void setPosition(String position) {
        this.position = position;
    }

    public String getSalary() {
        return salary;
    }

    public void setSalary(String salary) {
        this.salary = salary;
    }

    public String getLocation() {
        return location;
    }

    public void setLocation(String location) {
        this.location = location;
    }

    public String getPhone() {
        return phone;
    }

    public void setPhone(String phone) {
        this.phone = phone;
    }

    public List<Person> getPersonList() {
        return personList;
    }

    public void setPersonList(List<Person> personList) {
        this.personList = personList;
    }


}
- Create jsp folder inside WEB-INF folder
- Create jsp file name: paginationDisplayTag.jsp and copy paste below content in it
<!DOCTYPE HTML PUBLIC "-//W3C//DTD HTML 4.01 Transitional//EN"
"http://www.w3.org/TR/html4/loose.dtd">
<%@taglib uri="http://displaytag.sf.net" prefix="display" %>
<%@ taglib prefix="form" uri="http://www.springframework.org/tags/form"%>
<html>
<head>
    <meta http-equiv="Content-Type" content="text/html; charset=UTF-8">
    <title>Spring Pagination using Display Tag</title>
    <link rel="stylesheet" type="text/css" href="css/alternative.css">
    <link rel="stylesheet" type="text/css" href="css/displaytag.css">
    <link rel="stylesheet" type="text/css" href="css/maven-base.css">
    <link rel="stylesheet" type="text/css" href="css/maven-theme.css">
    <link rel="stylesheet" type="text/css" href="css/print.css">
    <link rel="stylesheet" type="text/css" href="css/screen.css">
    <link rel="stylesheet" type="text/css" href="css/site.css">
    <link rel="stylesheet" type="text/css" href="css/teststyles.css">

</head>
<body>
<form:form commandName="person" action="" method="post">
<h2>Spring Pagination using Display Tag</h2>
    <!-- To change column style please form this classes ISIS OR ITS OR Mars OR Simple OR Report OR Mark Column
    We have chosen style class="its"-->
    <display:table export="true"  name="person.personList" requestURI="/paginationDisplayTag.web" pagesize="15" class="its" >
        <display:column property="name" title="Name" sortable="true"   />
        <display:column property="position" title="Position" sortable="true"  />
        <display:column property="salary" title="Salary" sortable="true"  />
        <display:column property="location" title="Location" sortable="true"  />
        <display:column property="phone" title="Phone" sortable="true"  />
    </display:table>

</form:form>
</body>
</html>
Below are available once you download project in bottom:
- Create css folder inside WebContent folder and include all css which shows in jsp page inside it. You download project
- Create images folder inside WebContent folder and include all images
- Create img folder inside WebContent folder and include all images
- Create displaytag.properties file inside src folder and copy paste below content in it:
#sort.behavior=list
#sort.amount=list
#basic.empty.showtable=true
#basic.msg.empty_list=No results matched your criteria.
#paging.banner.placement=top
#paging.banner.onepage=<span class="pagelinks"></span>
export.types=csv excel xml pdf rtf
export.excel=true
export.csv=true
export.xml=true
export.pdf=true
export.rtf=true
export.excel.class=org.displaytag.export.excel.DefaultHssfExportView
export.csv.class=org.displaytag.export.CsvView
export.pdf.class=org.displaytag.export.DefaultPdfExportView
export.rtf.class=org.displaytag.export.DefaultRtfExportView
# if set, file is downloaded instead of opened in the browser window
#export.[mymedia].filename=
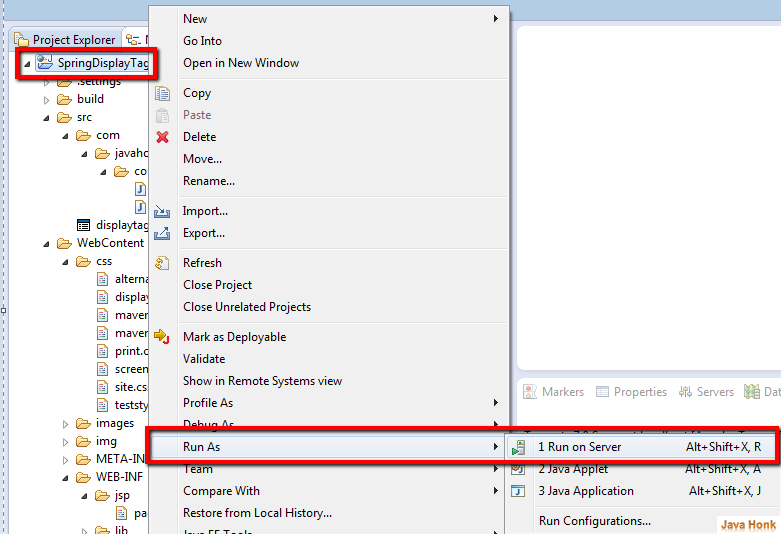
- Now lets run this set up in tomcat server. If you haven’t done tomcat set up in eclipse yet please use this link: Configure and Run Tomcat server in eclipse. Now right click project –>Run As –> Run on server as below:
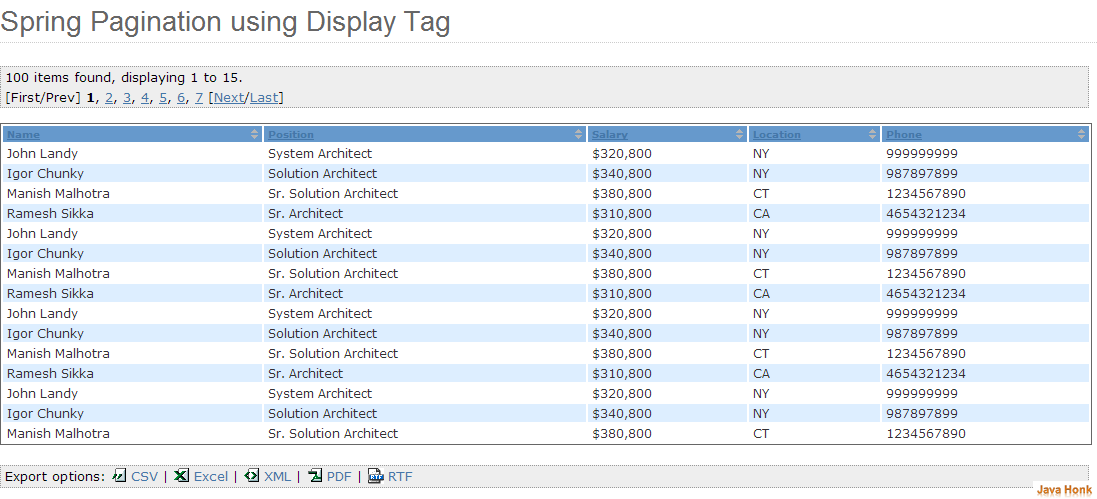
- Finally you will see below pagination screen with data click on column name to sort it and export option to export page in various formats:
![]() Download Project: SpringDisplayTagPagination
Download Project: SpringDisplayTagPagination
That’s it Display Tag Spring Pagination completed


Thank you,It help me a lot.
I want to know How to display all records with display tag along with pagination
yeah how do we do paging with server side call? Like get 100 rows each time from database when user hits next button.
If I am implementing above displaytag,for each page click it is making DAO call?Is there any way to avoid it as in the first DAO call itself i am getting all the records.