
Install TeamCity
This tutorial will show you step by step instruction to install TeamCity(8.1.4) on your local computer in window operating system environment.
Step 1: Go to http://www.jetbrains.com/teamcity/download/

As you could see above it comes in two edition: Professional edition and Enterprise edition. We will install Professional edition which is free with three build agents.
Step 2: Size of executable file is around 540 MB so it will take time to download. Once download is completed double click TeamCity-xxx.exe to start installation in you system. You will see below screen click Next

Step 3: Next screen click I Agree

Step 4: Next screen choose destination folder where you want to install TeamCity then click next

Step 5: Next screen keep all default selected and click next

Step 6: Next screen also keep everything default selected to store configuration setting and build results then click next

Step 7: Next screen you will see installation will start once completed enter TeamCity server port number where it will accessbile by default it will show up to use port 80 but we have choosen port number 99 then click next:


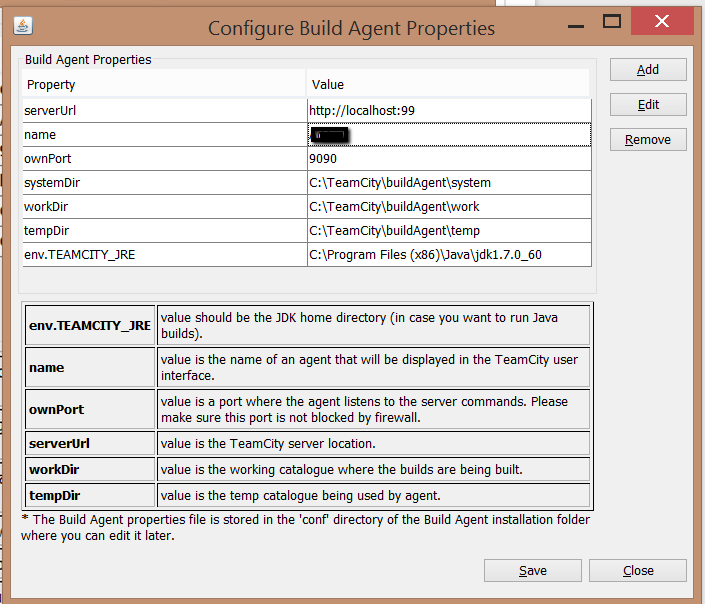
Step 8: Next screen you will see configure build agent properties. Keep all default properties (If you want to change you could also do so) then click save:
Step 9: Next screen you will agent properties were saved click OK

Step 10: Next screen you will see service account where you want to run TeamCity please select accordingly based on your need then click Next:

Step 11: Next screen you will see domain, user name and password. Domain and user name will be selected by default based on your user account please enter password will be your local computer domain password:

Step 12: Now you will see setup service where choose service which you want to start please kept default selected both services then click Next:

Step 13: Finally you will see completing TeamCity setup wizard and keep default selected to open TeamCity web UI after setup completed then click Finish:
 Step 14: Now TeamCity will be open in new web page where it will show Data dictionary configuration and location click Proceed:

Step 15: Now you will have to configure database connection setup:

Step 16: For this demo we have selected MySQL database for our configuration. You will have to copy MySQL jdbc driver to C:\ProgramData\JetBrains\TeamCity\lib\jdbc directory which you could download MySQL jdbc connector jar from maven site here and paste it to C:\ProgramData\JetBrains\TeamCity\lib\jdbc (Please note: Program data folder is hidden folder in window environment and to make it visible change it from folder option in control panel) then click Refresh JDBC driver you will see below screen. Give database name, user name and password then click proceed button:

Step 17: You will see TeamCity start creating database in this demo it will create teamcity database:

Step 18: Now you will see TeamCity licence agreement screen click Accept licence agreement then click continue button:

Step 19: Now it will show create administrator account screen to create account. Please create account user name and password of your choice then click create account button:

Step 20: Finally you will see TeamCity welcome screen as below:

Step 21: Enter general information then Click save change to save to the changes:

That’s it we have successfully installed TeamCity in local computer in window environment.
