Configure Log4j using XML properties file
Log4j API is open source framework which has been developed by many developers. This allows coder to control logging of the application based on their need. It highly configurable in runtime using external configuration files. Developer can keep log configuration file outside of the application and based on different environment application deployment it can be configured.
There are two ways to configure Log4j in the application:
- Using properties file
- Using XML file
Configuration of Log4j using XML is more popular than using properties file because it’s easy to understand, configuration separated by tag and easy to read/write.
There are five level of loggers may be assigned which is shown below in ascending order:
- TRACE
- DEBUG
- INFO
- WARN
- ERROR
- FATAL
We will configure Log4j in simple dynamic project. Below are needed:
- Eclipse 3.2 or above we are using Eclipse Kepler for demo (Download eclipse from here)
- JDK 1.6 or above (Download from here)
- Log4j jar file you could directly download from Apache web site here or you could also get it from project download link in the bottom
Step 1: Create dynamic web project in eclipse name: Log4jTest (Please use this link if you are not familiar how to create dynamic project in eclipse: Create Dynamic Web Project Eclipse)
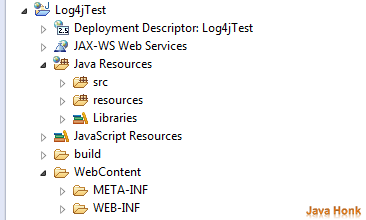
Step 2: Right click project –> New –> Source folder and create folder name resources. We are creating this folder to keep log4j configuration file and load it at run time. If you create as source folder then you don’t need to set class path of configuration file, eclipse automatically add sources folder in class path.
Folder structure:
Step 3: Create file name: log4j.properties inside resources folder and copy paste below content:
# Set root logger level to DEBUG and appender to Append1 and Append2.
log4j.rootLogger=INFO, Append1, Append2

# Append1 is set to be a ConsoleAppender
# Append2 is set to be a RollingFileAppender
log4j.appender.Append1=org.apache.log4j.ConsoleAppender
log4j.appender.Append2=org.apache.log4j.RollingFileAppender
#By default you will sample.log file inside project root folder
#Refresh you project to see this folder
#you can also change its location Example: C:\\Log4jTest.log
log4j.appender.Append2.File=Log4jTest.log

# Append1 & Append2 uses PatternLayout
log4j.appender.Append1.layout = org.apache.log4j.PatternLayout
log4j.appender.Append1.layout.ConversionPattern = %-4r [%t] %-5p %c %x - %m%n

log4j.appender.Append2.layout = org.apache.log4j.PatternLayout
log4j.appender.Append2.layout.ConversionPattern = %-4r [%t] %-5p %c %x - %m%n
Step 4: Create file name: log4j.xml inside resources folder and copy paste below content:
<?xml version="1.0" encoding="UTF-8"?>
<!DOCTYPE log4j:configuration PUBLIC
  "-//APACHE//DTD LOG4J 1.2//EN" "http://logging.apache.org/log4j/1.2/apidocs/org/apache/log4j/xml/doc-files/log4j.dtd">

<log4j:configuration xmlns:log4j="http://jakarta.apache.org/log4j/">

    <appender name="console" class="org.apache.log4j.ConsoleAppender">
        <param name="Target" value="System.out" />
        <layout class="org.apache.log4j.PatternLayout">
            <param name="ConversionPattern" value="%-5p %c{1} - %m%n" />
        </layout>
    </appender>

    <appender name="fileAppend" class="org.apache.log4j.RollingFileAppender">
        <param name="Threshold" value="INFO" />
        <param name="File" value="Log4jTestXML.log" />
        <layout class="org.apache.log4j.PatternLayout">
            <param name="ConversionPattern" value="%d %-5p  [%c{1}] %m %n" />
        </layout>
    </appender>

    <logger name="com.javahonk.Log4jTestUsingXMLFile" additivity="false">
        <level value="INFO" />
        <appender-ref ref="console" />
        <appender-ref ref="fileAppend" />
    </logger>

    <root>
        <priority value="debug" />
        <appender-ref ref="console" />
    </root>

</log4j:configuration>
Step 5: Include log4j-1.2.17.jar inside \WebContent\WEB-INF\lib\ folder
Step 6: Now let’s create class Log4jTestUsingPropertiesFile.java and test it:
package com.javahonk;
import org.apache.log4j.Logger;
import org.apache.log4j.PropertyConfigurator;


public class Log4jTestUsingPropertiesFile {

    private static Logger logger = Logger.getLogger(
        Log4jTestUsingPropertiesFile.class);

    public static void main(String[] args) {

    PropertyConfigurator.configure("resources\\log4j.properties");

    //Please note logger warn and debug is disable because
    //TRACE, DEBUG < INFO
    logger.trace("Logging from properties file");
    logger.debug("Logging from properties file");

    //Below will be enabled because
    //WARN, ERROR, FATAL > INFO
    logger.info("Logging from properties file");
    logger.warn("Logging from properties file");
    logger.error("Logging from properties file");
    logger.fatal("Logging from properties file");

    }

}
Step 7: To run : Right click Log4jTestUsingPropertiesFile –> Run as –> Java application you will below output on console:

Step 8: Now let’s create Log4jTestUsingXMLFile.java to test logger through XML configuration file:
package com.javahonk;

import org.apache.log4j.Logger;
import org.apache.log4j.xml.DOMConfigurator;

public class Log4jTestUsingXMLFile {

    private static Logger logger = Logger.getLogger(
        Log4jTestUsingXMLFile.class);

    public static void main(String[] args) {

    DOMConfigurator.configure("resources\\log4j.xml");

    //Please note logger warn and debug is disable because
    //TRACE, DEBUG < INFO
    logger.trace("Logging from XML file");
    logger.debug("Logging from XML file");

    //Below will be enabled because
    //WARN, ERROR, FATAL > INFO
    logger.info("Logging from XML file");
    logger.warn("Logging from XML file");
    logger.error("Logging from XML file");
    logger.fatal("Logging from XML file");

    }

}
Step 9: To run : Right click Log4jTestUsingXMLFile –> Run as –> Java application you will below output on console:
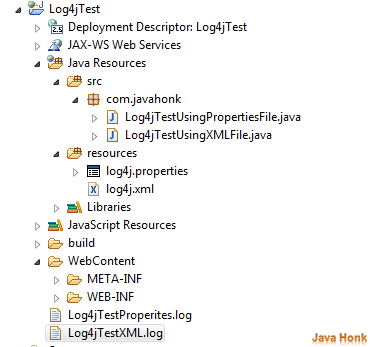
Step 10: Final project structure:
Step 11: Refresh your project you will see below two log file created inside project root folder with log:
- Log4jTestProperites.log
- Log4jTestXML.log
![]() Download Project source code: Log4jTest
Download Project source code: Log4jTest
That’s it Configure Log4j using XML properties file


