Create RESTful web service with JASON client
This demo application will show you how to create Simple Hello World Application Using JAX-RS and Jersey.
Note: If you are not familiar with RESTful web service and need depth introduction on it before developing application please read this documentation: RESTful web service introduction
In this example, the method helloWorld(@Context UriInfo uriInfo) is annotated with @GET and the @Produces(“text/html”) annotation. This method will process HTTP GET requests and read all url parameter enter by the HTML client then content in HTML.
Below technology are needed to build application:
- Eclipse Kepler
- Java 1.6
- Tomcat 7.0
- JAX-RS 1.1
- Jersey 1.8
- Maven 3.0
Steps:
- Create maven project name: FirstRESTfulHelloWorld (If you are not sure how to create maven project in eclipse please follow this tutorial: Create Maven project eclipse)
- Configure Tomcat server in eclipse (If you are not sure please follow this tutorial: Configure Tomcat server in eclipse)
- Now create package name: com.javahonk inside src/main/java folder
- Create class name HelloWorld.java and copy paste below code:
package com.javahonk;

import java.util.ArrayList;
import java.util.List;

import javax.ws.rs.Consumes;
import javax.ws.rs.GET;
import javax.ws.rs.POST;
import javax.ws.rs.Path;
import javax.ws.rs.PathParam;
import javax.ws.rs.Produces;
import javax.ws.rs.core.MediaType;
import javax.ws.rs.core.Response;

@Path("/user")
public class HelloWorld {

	private static List<User> users = new ArrayList<User>();
	@POST
	@Path("/add")
	@Consumes(MediaType.APPLICATION_JSON)
	@Produces(MediaType.TEXT_HTML)
	public Response addUser(User us) {
		users.add( us );
		return Response.status(200).entity("Successfully added below user: </br>" + us.getName()).build();
	}

	@GET
	@Path("/search")
	@Produces(MediaType.APPLICATION_JSON)
	public List<User> getUser(@PathParam("userId") String id){
		return users;
	}
}
- Create class name User.java inside package com.javahonk and copy paste below code:
package com.javahonk;

public class User {
	private String name;
	private String age;
	private String country;
	private String zip;

	public String getName() {
		return name;
	}

	public void setName(String name) {
		this.name = name;
	}

	public String getAge() {
		return age;
	}

	public void setAge(String age) {
		this.age = age;
	}

	public String getCountry() {
		return country;
	}

	public void setCountry(String country) {
		this.country = country;
	}

	public String getZip() {
		return zip;
	}

	public void setZip(String zip) {
		this.zip = zip;
	}

}
- Create index.jsp inside webapp and copy paste below code:
<html>
<script
src="http://ajax.googleapis.com/ajax/libs/jquery/1.10.2/jquery.min.js">
</script>
<script>
	$(document).ready(
	function() {
		$("#search").click(
				function() {
					$.ajax({
						url : "rest/user/search",
						success : function(result) {
							$('#searchResult').html('');
							$.each(result, function(index, user) {
								$('#searchResult').append(
										'<li>  <b>Name :</b> '
												+ user.name
												+ '</br><b>Age :</b>'
												+ user.age
												+ '</br><b> Country :</b>'
												+ user.country
												+ '</br><b>Zip :</b>'
												+ user.zip + '</li>');

							});
						}
					});
				});
				$(".numericOnly").keypress(function(e) {
					if (String.fromCharCode(e.keyCode).match(/[^0-9]/g))
						return false;
				});

				$("#userForm").submit(function() {
					name = $(this).find("#name").val();
					age = $(this).find("#age").val();
					country = $(this).find("#country").val();
					zip = $(this).find("#zip").val();
					var arr = {
						"name" : name,
						"age" : age,
						"country" : country,
						"zip" : zip
					};
					$.ajax({
						type : 'post',
						url : 'rest/user/add',
						contentType : 'application/json',
						data : JSON.stringify(arr),
						success : function(result) {
							$('#addResult').html('');
							$('#addResult').html(result);

						},
						failure : function(result) {
							$('#addResult').html('');
							$('#addResult').html(result);

						}
					});
					return false;
				});

			});
</script>
<body>
	<div id="addResult" style="color: red;font-size: 24px"></div>
	<h2>Fill out form to add user!</h2>

	<form id="userForm">
		<table>
			<tr>
				<td>Name :</td>
				<td><input type="text" name="name" id="name" /></td>
			</tr>
			<tr>
				<td>Age :</td>
				<td><input type="text" name="age" id="age" /></td>
			</tr>
			<tr>
				<td>Country :</td>
				<td><input type="text" name="country" id="country" /></td>
			</tr>
			<tr>
				<td>Zip :</td>
				<td><input type="text" name="zip" id="zip" class="numericOnly" />
				</td>
			</tr>
			<tr>
				<td><input type="submit" value="Add User" /></td>
				<td><input type="button" value="Search Users" id="search" /></td>
			</tr>
		</table>
	</form>
	<div id="searchResult">Search Result will Appear here!</div>

</body>
</html>
- Copy paste below maven dependency jar into your pom.xml file:
<project xmlns="http://maven.apache.org/POM/4.0.0" xmlns:xsi="http://www.w3.org/2001/XMLSchema-instance"
  xsi:schemaLocation="http://maven.apache.org/POM/4.0.0 http://maven.apache.org/maven-v4_0_0.xsd">
  <modelVersion>4.0.0</modelVersion>
  <groupId>com.javahorn</groupId>
  <artifactId>RestFulService</artifactId>
  <packaging>war</packaging>
  <version>0.0.1-SNAPSHOT</version>
  <name>RestFulService Maven Webapp</name>
  <url>http://maven.apache.org</url>
  <dependencies>
    <dependency>
      <groupId>junit</groupId>
      <artifactId>junit</artifactId>
      <version>3.8.1</version>
      <scope>test</scope>
    </dependency>
    <dependency>
        <groupId>com.sun.jersey</groupId>
        <artifactId>jersey-server</artifactId>
        <version>1.8</version>
    </dependency>
    <dependency>
        <groupId>com.sun.jersey</groupId>
        <artifactId>jersey-json</artifactId>
        <version>1.8</version>
    </dependency>
    <dependency>
	<groupId>com.sun.jersey</groupId>
	<artifactId>jersey-bundle</artifactId>
	<version>1.10-b01</version>
</dependency>
  </dependencies>
  <build>
    <finalName>RestFulService</finalName>
  </build>
</project>
- Now copy paste below code in your web.xml file:
<!DOCTYPE web-app PUBLIC
 "-//Sun Microsystems, Inc.//DTD Web Application 2.3//EN"
 "http://java.sun.com/dtd/web-app_2_3.dtd" >

<web-app>
  <display-name>First RESTful Hello World</display-name>
  <servlet>
		<servlet-name>rest-servlet</servlet-name>
		<servlet-class>
			com.sun.jersey.spi.container.servlet.ServletContainer
		</servlet-class>
		<init-param>
			<param-name>com.sun.jersey.config.property.packages</param-name>
			<param-value>com.javahonk</param-value>
		</init-param>
		<init-param>
			<param-name>com.sun.jersey.api.json.POJOMappingFeature</param-name>
			<param-value>true</param-value>
		</init-param>
		<load-on-startup>1</load-on-startup>
	</servlet>

	<servlet-mapping>
		<servlet-name>rest-servlet</servlet-name>
		<url-pattern>/rest/*</url-pattern>
	</servlet-mapping>

	<welcome-file-list>
        <welcome-file>index.jsp</welcome-file>
    </welcome-file-list>

</web-app>
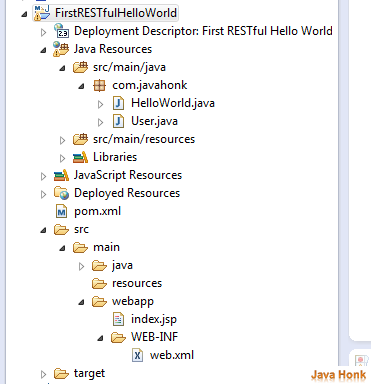
- After all steps your project should look as below:
- Now refresh and clean your project.
- To run project: Right click project –> Run As –> Run on Server
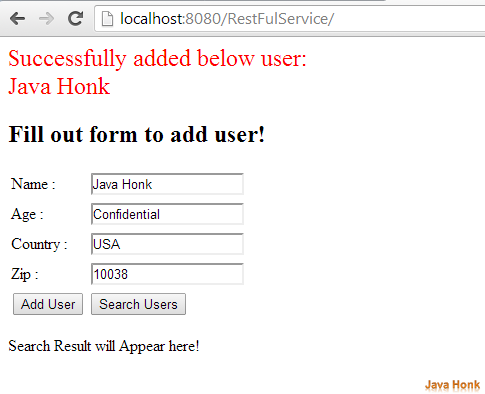
- You will see below first index.jsp page click Add User button:

- After click Add User you will see the user added message:
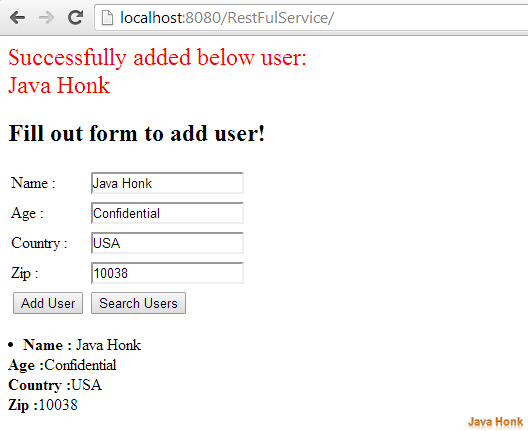
- Now Click Search Users you will see user we added will show up:
- That’s it. We have created our RESTful web service with JASON client.
 Download project: FirstRESTfulHelloWorld
