Hibernate One To Many tutorial
This tutorial will show you how to configure hibernate One To Many Mapping with MySQL database with project using Maven in eclipse. At the end we will be able to insert and select data from MySQL database.
Hibernate One To Many tutorial tools needed:
- Eclipse ( We are using eclipse Kepler)
- Install JBoss tools in eclipse. If you are not sure how to install JBoss in eclipse please user this URL:Install JBoss tools in eclipse
- MySQL data base (Install MySQL Community Server (GPL) version in your system : MySQL Community Server). We are using version 5.6
- Hibernate 3.2
- Maven 3.0.4
Hibernate One To Many tutorial -below are steps:
1. Create table in MySQL data base script:
CREATE TABLE mother (
	First_Name	varchar(50) NULL,
	Last_Name  	varchar(25) NULL,
	City      	varchar(25) NULL,
	Zip       	varchar(25) NULL,
	State     	varchar(25) NULL,
	id        	int(11) NOT NULL DEFAULT '0' ,
    PRIMARY KEY (id)
	)
GO

CREATE TABLE child (
	First_Name	varchar(50) NULL,
    Last_Name	varchar(50) NULL,
	id        	int(11) NOT NULL DEFAULT '0',
PRIMARY KEY (id),
mother_id INT default NULL
)
2. EER diagram:

Intentionally we didn’t created primary and foreign relation between table to keep thing simple and straight forward. We will create one-to-many relationship using mapping file using one-to-many tag. As you could see in above diagram it shows both table has primary key id and child table has reference column mother_id which will be inserted from mother table and that is our one to many relationship between mother and child. Child can have only one mother but mother can have many children. If you are wondering how I have created EER diagram from the table – MySQL wordbench has been used to generate EER diagram. When you install MySQL it comes with it.
2. Eclipse setup:
- Open your eclipse
- Create Maven project name: HibernateMySQLTest
- By default eclipse kepler creates dynamic maven project of version 2.3. If you try to change version to 2.5 through Right click project –>Properties –> Project Facet will give you an error and if you are getting error then click Window –> Show view –> Other –> General –> Navigator –> Click OK
- Eclipse will change in Navigator perspective. Click .setting folder — and open file name Open org.eclipse.wst.common.project.facet.core.xml file then make change show below:
<?xml version="1.0" encoding="UTF-8"?>
<faceted-project>
  <fixed facet="wst.jsdt.web"/>
  <installed facet="java" version="1.5"/>
  <installed facet="jst.web" version="2.5"/>
  <installed facet="wst.jsdt.web" version="1.0"/>
</faceted-project>
- This will change maven dynamic project version 2.5.
- Now create resources folder inside src/main.
- Create package com.javahonk and com.javahonk.bean and com.javahonk.util
- Project structure shown below:

3. Hibernate configuration:
- We have used hibernate tools to generate all class and mapping file. Please follow this URL if you want to see details how we have done it : Generate hibernate model class and mapping files automatically .
4. Create hibernate configuration file:
- Create file name hibernate.cfg.xml under src/main/resources folder and copy paste below code(Note: Change your MySQL value accordingly)
<?xml version="1.0" encoding="UTF-8"?>
<!DOCTYPE hibernate-configuration PUBLIC
		"-//Hibernate/Hibernate Configuration DTD 3.0//EN"
		"http://hibernate.sourceforge.net/hibernate-configuration-3.0.dtd">
<hibernate-configuration>
    <session-factory>
        <property name="hibernate.connection.driver_class">com.mysql.jdbc.Driver</property>
        <property name="hibernate.connection.password">admin</property>
        <property name="hibernate.connection.url">jdbc:mysql://localhost:3306/JavaHonk</property>
        <property name="hibernate.connection.username">root</property>
        <property name="hibernate.default_schema">JavaHonk</property>
        <property name="hibernate.dialect">org.hibernate.dialect.MySQLDialect</property>

        <property name="show_sql">true</property>
        <mapping resource="Mother.hbm.xml"></mapping>
        <mapping resource="Child.hbm.xml"></mapping>
    </session-factory>
</hibernate-configuration>
5. Add dependency in pom.xml file.
- Copy paste below pom.xml file to your file:
<project xmlns="http://maven.apache.org/POM/4.0.0" xmlns:xsi="http://www.w3.org/2001/XMLSchema-instance"
  xsi:schemaLocation="http://maven.apache.org/POM/4.0.0 http://maven.apache.org/maven-v4_0_0.xsd">
  <modelVersion>4.0.0</modelVersion>
  <groupId>com.javahonk</groupId>
  <artifactId>HibernateMySQLTest</artifactId>
  <packaging>war</packaging>
  <version>0.0.1-SNAPSHOT</version>
  <name>HibernateMySQLTest Maven Webapp</name>
  <url>http://maven.apache.org</url>
  <dependencies>
    <dependency>
      <groupId>junit</groupId>
      <artifactId>junit</artifactId>
      <version>3.8.1</version>
      <scope>test</scope>
    </dependency>

    <!-- MySQL database -->
	<dependency>
		<groupId>mysql</groupId>
		<artifactId>mysql-connector-java</artifactId>
		<version>5.1.9</version>
	</dependency>

	<dependency>
		<groupId>org.hibernate</groupId>
		<artifactId>hibernate</artifactId>
		<version>3.2.3.ga</version>
	</dependency>

	<dependency>
		<groupId>dom4j</groupId>
		<artifactId>dom4j</artifactId>
		<version>1.6.1</version>
	</dependency>

	<dependency>
		<groupId>commons-logging</groupId>
		<artifactId>commons-logging</artifactId>
		<version>1.1.1</version>
	</dependency>

	<dependency>
		<groupId>commons-collections</groupId>
		<artifactId>commons-collections</artifactId>
		<version>3.2.1</version>
	</dependency>

	<dependency>
		<groupId>cglib</groupId>
		<artifactId>cglib</artifactId>
		<version>2.2</version>
	</dependency>

	<dependency>
		<groupId>javax.transaction</groupId>
		<artifactId>jta</artifactId>
		<version>1.1</version>
	</dependency>

	<dependency>
		<groupId>asm</groupId>
		<artifactId>asm</artifactId>
		<version>3.1</version>
	</dependency>

  </dependencies>
  <build>
    <finalName>HibernateMySQLTest</finalName>
  </build>
</project>
6. Create mapping file
- Create mapping file name: Mother.hbm.xml inside src/main/resources folder and copy paste below code:
<?xml version="1.0"?>
<!DOCTYPE hibernate-mapping PUBLIC "-//Hibernate/Hibernate Mapping DTD 3.0//EN"
"http://hibernate.sourceforge.net/hibernate-mapping-3.0.dtd">
<!-- Generated Feb 21, 2014 9:49:53 PM by Hibernate Tools 3.4.0.CR1 -->
<hibernate-mapping>
    <class name="com.javahonk.bean.Mother" table="mother">
        <id name="id" type="int">
            <column name="id" />
            <generator class="increment" />
        </id>
        <property name="firstName" type="string">
            <column name="First_Name" length="50" />
        </property>
        <property name="lastName" type="string">
            <column name="Last_Name" length="25" />
        </property>
        <property name="city" type="string">
            <column name="City" length="25" />
        </property>
        <property name="zip" type="string">
            <column name="Zip" length="25" />
        </property>
        <property name="state" type="string">
            <column name="State" length="25" />
        </property>

        <set name="childs" cascade="all">
         <key column="mother_id"/>
         <one-to-many class="com.javahonk.bean.Child"/>
        </set>
    </class>
</hibernate-mapping>
- Create mapping file name: Child.hbm.xml inside src/main/resources folder and copy paste below code:
<?xml version="1.0"?>
<!DOCTYPE hibernate-mapping PUBLIC "-//Hibernate/Hibernate Mapping DTD 3.0//EN"
"http://hibernate.sourceforge.net/hibernate-mapping-3.0.dtd">
<!-- Generated Feb 21, 2014 9:49:53 PM by Hibernate Tools 3.4.0.CR1 -->
<hibernate-mapping>
    <class name="com.javahonk.bean.Child" table="child">
        <id name="id" type="int">
            <column name="id" />
            <generator class="increment" />
        </id>
        <property name="firstName" type="string">
            <column name="First_Name" length="50" />
        </property>
        <property name="lastName" type="string">
            <column name="Last_Name" length="50" />
        </property>
    </class>
</hibernate-mapping>
Hibernate One To Many Mapping tutorial Note: Please take look at Mother mapping file we have created one-to-many tag which creates relation between Mother and Child. As also see in the data base table we have created two table person and address where both has their own primary key and made relation with them using column name mother_id on table child. Also see below tag
<generator class="increment" />
in both Mother.hbm.xml and Child.hbm.xml where we are using class increment which will increase id value of mother & child table automatically and we don’t need to set it explicitly during insertion data to the table and because we have one-to-many reference to the child table so data will be inserted in mother table first then child table and copy whatever data we set from our main class.
7. Create model class
- Create model class name: Mother.java inside package com.javahonk.bean and copy paste below code:
package com.javahonk.bean;

import java.util.Set;

// default package
// Generated Feb 21, 2014 9:49:53 PM by Hibernate Tools 3.4.0.CR1

/**
 * Mother generated by hbm2java
 */
public class Mother implements java.io.Serializable {

	/**
	 *
	 */
	private static final long serialVersionUID = 1L;
	private int id;
	private String firstName;
	private String lastName;
	private String city;
	private String zip;
	private String state;

	private Set<Child> childs;

	public Mother() {
	}

	public Mother(int id) {
		this.id = id;
	}

	public Mother(int id, String firstName, String lastName, String city,
			String zip, String state) {
		this.id = id;
		this.firstName = firstName;
		this.lastName = lastName;
		this.city = city;
		this.zip = zip;
		this.state = state;
	}

	public int getId() {
		return this.id;
	}

	public void setId(int id) {
		this.id = id;
	}

	public String getFirstName() {
		return this.firstName;
	}

	public void setFirstName(String firstName) {
		this.firstName = firstName;
	}

	public String getLastName() {
		return this.lastName;
	}

	public void setLastName(String lastName) {
		this.lastName = lastName;
	}

	public String getCity() {
		return this.city;
	}

	public void setCity(String city) {
		this.city = city;
	}

	public String getZip() {
		return this.zip;
	}

	public void setZip(String zip) {
		this.zip = zip;
	}

	public String getState() {
		return this.state;
	}

	public void setState(String state) {
		this.state = state;
	}

	public Set<Child> getChilds() {
		return childs;
	}

	public void setChilds(Set<Child> childs) {
		this.childs = childs;
	}

}
- Create model class name: Child.java inside package com.javahonk.bean and copy paste below code
package com.javahonk.bean;
// default package
// Generated Feb 21, 2014 9:49:53 PM by Hibernate Tools 3.4.0.CR1

/**
 * Child generated by hbm2java
 */
public class Child implements java.io.Serializable {

	/**
	 *
	 */
	private static final long serialVersionUID = 1L;
	private int id;
	private String firstName;
	private String lastName;

	public Child() {
	}

	public Child(int id) {
		this.id = id;
	}

	public Child(int id, String firstName, String lastName) {
		this.id = id;
		this.firstName = firstName;
		this.lastName = lastName;
	}

	public int getId() {
		return this.id;
	}

	public void setId(int id) {
		this.id = id;
	}

	public String getFirstName() {
		return this.firstName;
	}

	public void setFirstName(String firstName) {
		this.firstName = firstName;
	}

	public String getLastName() {
		return this.lastName;
	}

	public void setLastName(String lastName) {
		this.lastName = lastName;
	}

}
8. Create utility class
- Create util class name HibernateUtil.java inside com.javahonk.util package and copy paste below code:
package com.javahonk.util;

import org.hibernate.SessionFactory;
import org.hibernate.cfg.Configuration;

public class HibernateUtil {
	private static final SessionFactory sessionFactory = buildSessionFactory();

	private static SessionFactory buildSessionFactory() {
		try {
			return new Configuration().configure().buildSessionFactory();
		} catch (Throwable ex) {
			System.err.println("Initial SessionFactory creation failed." + ex);
			throw new ExceptionInInitializerError(ex);
		}
	}

	public static SessionFactory getSessionFactory() {
		return sessionFactory;
	}

	public static void shutdown() {
		// Close caches and connection pools
		getSessionFactory().close();
	}
}
9. Create main class
- Finally create class which is java main class. We will use this class to insert and select data from table. Create class name OneToManyInsert.java inside package com.javahonk and copy paste below code in it:
package com.javahonk;

import java.util.HashSet;
import java.util.Iterator;
import java.util.List;
import java.util.Set;

import org.hibernate.Session;
import org.hibernate.SessionFactory;

import com.javahonk.bean.Child;
import com.javahonk.bean.Mother;
import com.javahonk.util.HibernateUtil;

public class OneToManyInsert {

	public static void main(String[] args) {

        SessionFactory sf = HibernateUtil.getSessionFactory();
        Session session = sf.openSession();
        session.beginTransaction();

        Mother mother=new Mother();
        mother.setFirstName("Mary");
        mother.setLastName("Kay");
        mother.setCity("Edison");
        mother.setZip("10038");
        mother.setState("NJ");

        Child child=new Child();
        child.setFirstName("Tom");
        child.setLastName("Kay");

        Child child2=new Child();
        child2.setFirstName("John");
        child2.setLastName("Kay");

        HashSet<Child> set1 = new HashSet<Child>();
        set1.add(child);
        set1.add(child2);

        mother.setChilds(set1);
        session.save(mother);

        List<Mother> moList = session.createQuery("from Mother").list();
        for (Mother mother2 : moList) {
            System.out.println("Mother table data:");
            System.out.println("First Name: "+mother2.getFirstName()+" Last Name: "+mother2.getLastName()+" City: "+mother2.getCity()+" State: "+mother2.getState()+" Zip: "+mother2.getZip()+"\n");
            System.out.println("Child table data:");
            Set<Child> childs=mother2.getChilds();
            for (Iterator<Child> iterator = childs.iterator(); iterator.hasNext();) {
				Child child3 = (Child) iterator.next();
				System.out.println("First Name: "+child3.getFirstName()+" Last name: "+child3.getLastName()+"\n");

			}

        }

        session.getTransaction().commit();
        session.close();

	}

}
- Hibernate one to many tutorial : We are all set to run our code. Before run refresh and clean your project. Right click OneToOneMany.java class –> Run As –> Java Application
- You will see on console it has inserted data to table name address and person and selected data from the table that also show on console as below:
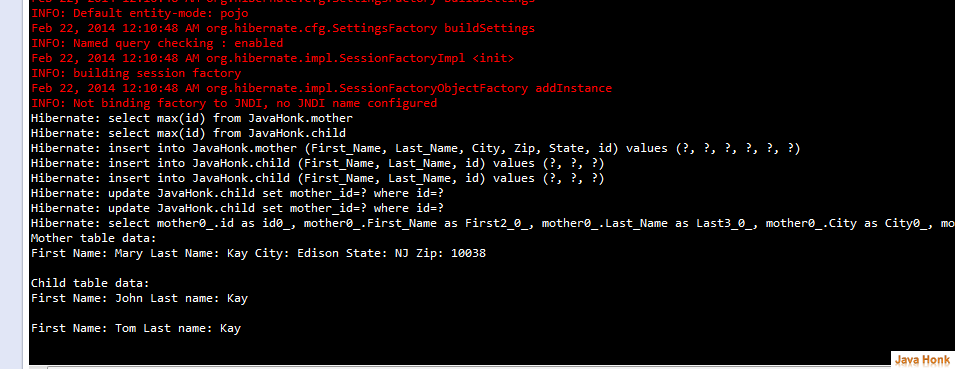
10. Data inserted to the table

- That’s it. Hibernate One To Many tutorial completed.
![]() Download project: HibernateMySQLTest
Download project: HibernateMySQLTest
