Java Servlet hello world
This demo will show you how to create servlet dynamic web application hello world in java. We will create java servlet hello world application using dynamic web module 3.0.
Please note: If you use dynamic web module 3.0 it uses annotation to map servlet URL in class itself not in web.xml file that you will see later in class.
Below are needed:
- Eclipse 3.2 or above we are using Eclipse Kepler for demo (Download eclipse from here)
- JDK 1.6 or above (Download from here)
- Tomcat 6 or above (Please follow link to install and configure tomcat in eclipse:Configure and Run Tomcat server in eclipse
Please follow below steps:
- Please choose dynamic web module 3.0 while creating dynamic web project
- Create dynamic web project in eclipse name: JavaServlet (Please use this link if you are not familiar how to create dynamic project in eclipse: Create Dynamic Web Project Eclipse)
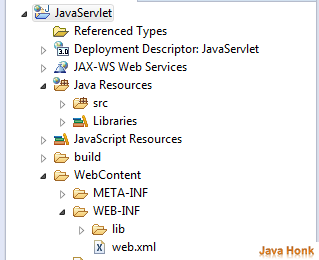
Project structure:
- Create servlet class name: TestServlet.java inside com.javahonk package in src folder. Please see annotation @WebServlet(“/TestServlet”) in below class which maps servlet URL:
package com.javahonk;

import java.io.IOException;
import javax.servlet.ServletException;
import javax.servlet.annotation.WebServlet;
import javax.servlet.http.HttpServlet;
import javax.servlet.http.HttpServletRequest;
import javax.servlet.http.HttpServletResponse;

/**
 * Servlet implementation class TestServlet
 */
@WebServlet("/TestServlet")
public class TestServlet extends HttpServlet {
    private static final long serialVersionUID = 1L;

    /**
     * @see HttpServlet#HttpServlet()
     */
    public TestServlet() {
        super();
        // TODO Auto-generated constructor stub
    }

    /**
     * @see HttpServlet#doGet(HttpServletRequest request,
     * HttpServletResponse response)
     */
    protected void doGet(HttpServletRequest request,
            HttpServletResponse response)
                    throws ServletException, IOException {
        request.setAttribute("message", "Hello from servlet");
        request.getRequestDispatcher("/servletWelcome.jsp").
            forward(request, response);
    }

    /**
     * @see HttpServlet#doPost(HttpServletRequest request,
     * HttpServletResponse response)
     */
    protected void doPost(HttpServletRequest request,
            HttpServletResponse response)
                    throws ServletException, IOException {
        // TODO Auto-generated method stub
    }

}
- Create index.jsp inside WebContent folder:
<%@ page language="java" contentType="text/html; charset=ISO-8859-1"
    pageEncoding="ISO-8859-1"%>
<%@ taglib prefix="c" uri="http://java.sun.com/jsp/jstl/core" %>
<!DOCTYPE html PUBLIC "-//W3C//DTD HTML 4.01 Transitional//EN" "http://www.w3.org/TR/html4/loose.dtd">
<html>
<head>
<meta http-equiv="Content-Type" content="text/html; charset=ISO-8859-1">
<title>Insert title here</title>
</head>
<body>
<form action="TestServlet">
<h1>Hello world!!!</h1>
<input type="submit" value="Submit Request to servlet">

<c:if test="${not empty message}">
<h1>${message}</h1>
</c:if>
</form>
</body>
</html>
- Create servletWelcome.jsp inside WebContent folder:
<%@ page language="java" contentType="text/html; charset=ISO-8859-1"
    pageEncoding="ISO-8859-1"%>
<%@ taglib prefix="c" uri="http://java.sun.com/jsp/jstl/core" %>
<!DOCTYPE html PUBLIC "-//W3C//DTD HTML 4.01 Transitional//EN" "http://www.w3.org/TR/html4/loose.dtd">
<html>
<head>
<meta http-equiv="Content-Type" content="text/html; charset=ISO-8859-1">
<title>Insert title here</title>
</head>
<body>
<c:if test="${not empty message}">
<h1>${message}</h1>
</c:if>
</body>
</html>
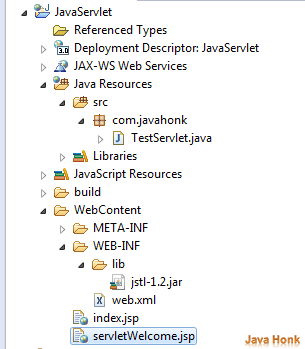
- Include jstl-1.2 jar inside lib folder (Jar is already included in project which you could download in the bottom of page)
- Final project structure:
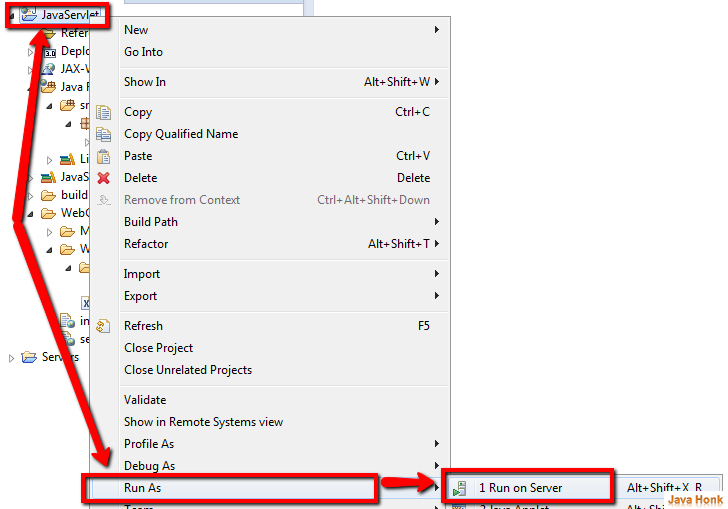
- That’s it. Now we are ready to run this project.To run this project right click project –> Click Run As –> Run on Server as below:
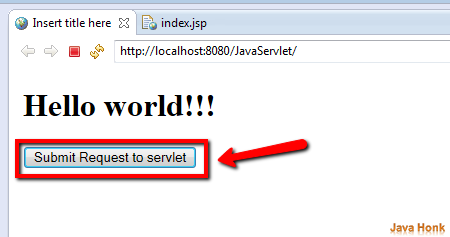
- You will see below first welcome screen click Submit Request to servlet button to submit request to the servlet and get response back:
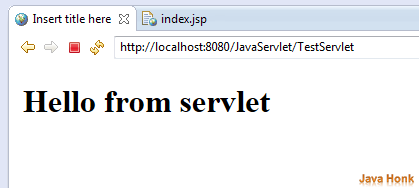
- Servlet will send response back as below:
![]() Download Project: Servlet hello world
Download Project: Servlet hello world
That’s it Java Servlet hello world completed

