JMS Publish Subscribe Chat Application
In previous tutorials you saw how to create Queue and Topic standalone application, publish subscribe topic application etc… using JBoss JMS. Today we will create simple chat application using topic where we will publish message and subscriber will consume message from it.
Tools needed:
- JBoss application server jboss-6.1.0.Final community version (You can use any version of JBoss application server which you could download from here). If you are using version other than jboss-6.1.0.Final community version only JMS configuration will be different and use this tutorial to configure Queue and topic.
- Eclipse Kepler (You could use any version of eclipse above 4.2)
Steps:
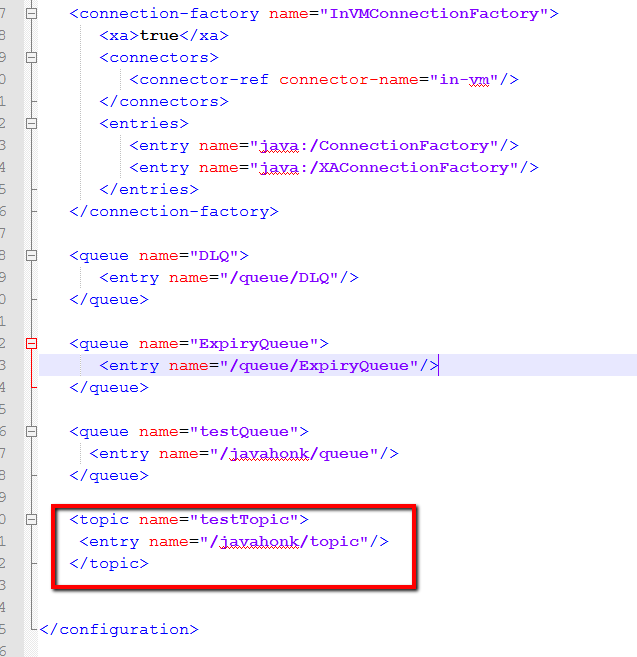
- Configure JMS Topic destination on jboss-6.1.0.Final application server: Go to jboss-6.1.0.Final\server\default\deploy\hornetq\hornetq-jms.xml and add below topic:

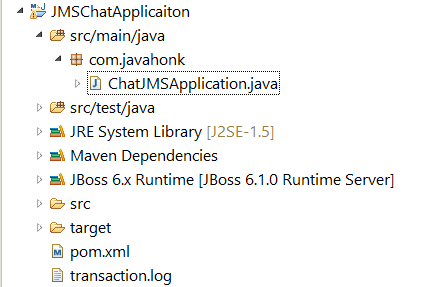
- Create maven project name: JMSChatApplication and below is final project structure:
- Configure JBoss application server in eclipse using this tutorial
- To include include all JBoss related jars to to class path: right click project –> properties –> Java build path –> on library tab click add library… –> Server runtime –> if you configured Jboss in eclipse you will see JBoss Runtime server choose it –> click finish.
- pom.xml:
<project xmlns="http://maven.apache.org/POM/4.0.0" xmlns:xsi="http://www.w3.org/2001/XMLSchema-instance"
  xsi:schemaLocation="http://maven.apache.org/POM/4.0.0 http://maven.apache.org/xsd/maven-4.0.0.xsd">
  <modelVersion>4.0.0</modelVersion>

  <groupId>com.javahonk</groupId>
  <artifactId>JMSChatApplication</artifactId>
  <version>0.0.1-SNAPSHOT</version>
  <packaging>jar</packaging>

  <name>JMSChatApplication</name>
  <url>http://maven.apache.org</url>

  <properties>
    <project.build.sourceEncoding>UTF-8</project.build.sourceEncoding>
  </properties>

  <dependencies>
    <dependency>
      <groupId>junit</groupId>
      <artifactId>junit</artifactId>
      <version>3.8.1</version>
      <scope>test</scope>
    </dependency>
  </dependencies>
</project>
- Now create class name ChatJMSApplicaiton is main class where we will create connection, session, publisher, subscriber and send receive message from topic as below:
package com.javahonk;

import javax.jms.*;
import javax.naming.*;

import java.io.*;
import java.util.Properties;

public class ChatJMSApplication implements MessageListener {

	private TopicSession pubSession;
	private TopicSession subSession;
	private TopicConnectionFactory connectionFactory = null;
	private TopicPublisher publisher;
	private TopicSubscriber subscriber;
	private TopicConnection connection;

	public static Context getInitialContext() throws javax.naming.NamingException {

		Properties p = new Properties();
		p.put(Context.INITIAL_CONTEXT_FACTORY, "org.jnp.interfaces.NamingContextFactory");
		p.put(Context.URL_PKG_PREFIXES, " org.jboss.naming:org.jnp.interfaces");
		p.put(Context.PROVIDER_URL, "jnp://localhost:1099");
		return new javax.naming.InitialContext(p);
	}


	public ChatJMSApplication() throws Exception {

		Context ic = getInitialContext();

		// Look up a JMS connection factory
		connectionFactory = (TopicConnectionFactory) ic.lookup("/ConnectionFactory");

		// Create a JMS connection
		connection = connectionFactory.createTopicConnection();

		// Create two JMS session objects
		pubSession = connection.createTopicSession(false,Session.AUTO_ACKNOWLEDGE);
		subSession = connection.createTopicSession(false,Session.AUTO_ACKNOWLEDGE);

		// Look up a JMS topic
		Topic ChatJMSApplicationTopic = (Topic) ic.lookup("javahonk/topic");

		// Create a JMS publisher and subscriber
		publisher = pubSession.createPublisher(ChatJMSApplicationTopic);
		subscriber = subSession.createSubscriber(ChatJMSApplicationTopic);

		// Set a JMS message listener
		subscriber.setMessageListener(this);

		// Initialize the ChatJMSApplication application
		set(connection, pubSession, subSession, publisher);

		// Start the JMS connection; allows messages to be delivered
		connection.start();

	}

	/* Initialize the instance variables */
	public void set(TopicConnection con, TopicSession pubSess, TopicSession subSess, TopicPublisher pub) {
		this.connection = con;
		this.publisher = pub;
	}

	/* Receive message from topic subscriber */
	public void onMessage(Message message) {
		try {
			TextMessage textMessage = (TextMessage) message;
			String text = textMessage.getText();
			System.out.println(text);
		} catch (JMSException jmse) {
			jmse.printStackTrace();
		}
	}

	/* Create and send message using topic publisher */
	protected void writeMessage(String text) throws JMSException {

		TextMessage message = pubSession.createTextMessage();
		message.setText("Message received: " + " : " + text);
		publisher.publish(message);
	}

	/* Close the JMS connection */
	public void close() throws JMSException {
		connection.close();
	}

	/* Run the ChatJMSApplication client */
	public static void main(String[] args) {
		try {

			ChatJMSApplication ChatJMSApplication = new ChatJMSApplication();

			// Read input from command line
			BufferedReader commandLine = new java.io.BufferedReader(new InputStreamReader(System.in));

			// Continue while loop until user type word "exit"
			while (true) {
				String s = commandLine.readLine();
				if (s.equalsIgnoreCase("exit")) {
					ChatJMSApplication.close(); // close the connection
					System.exit(0);// exit from program
				} else
					ChatJMSApplication.writeMessage(s);
			}
		} catch (Exception e) {
			e.printStackTrace();
		}
	}

}
- Start JBoss server: Go to %JBOSS_HOME%/bin –> Double click run.bat to start the server. Once server is started it will pick up configured topic automatically.
- To run chat application right click ChatJMSApplication.java –> Run As –> Java Application you will see console and its ready for message. Below is example:
![]() Download Project: JMSChatApplicaiton
Download Project: JMSChatApplicaiton


