Introduction: Spring framework made JDBC coding very easy and its JDBC abstraction framework offers all boiler plate codes, only very few things has to be taken care by the programmer. Below list shows steps required to make any database call and because here we will use spring JDBC template so only two steps from the list which shown in green coded by programmer:
- Define all connection parameters
- Open connection to the database
- Specify statement
- Prepare and execute statements
- Iterate results through loop
- Do work for each iteration
- Process any exception which application throws
- Handle transactions if any
- Finally close connection
JdbcTemplate: Spring JdbcTemplate class is principal class in JDBC core package. It handles creation and release of resources which simplifies use of JDBC. Basically when we do JDBC coding its easy forget to close the connection JDBCTemplate helps to avoid these kind of common errors. It performs all core JDBC workflow i.e. statement creation, execution, leaving code to provide SQL and finally extract the results. It is responsible executes update statements or stored procedure calls, SQL queries and iterate over ResultSets to extract returned parameter values. Important to know that, it catches JDBC exceptions and translates it to more informative, generic, exception hierarchy which is defined in org.springframework.dao package.
If you are using JdbcTemplate then need is only to implement callback interfaces provide them clearly defined contract. For example PreparedStatementCreator callback interface creates prepared statement given Connection provided by using this class and providing SQL with any parameters which is required. Same is applicable to CallableStatementCreator interface as well where creates callable statement. RowCallbackHandler interface extracts values from each row of ResultSet.
Implementation: Now to integrate jdbctemplate to code first you will have to create Datasource property file to put all database related configuration in it. If summarize datasource file gives portability, enables connection pooling and distributed transactions etc…
Spring jdbctemplate tutorial tools needed:
- Eclipse ( We are using eclipse Kepler. You could also download eclipse from eclipse.org/downloads)
- MySQL data base (Install MySQL Community Server (GPL) version in your system : MySQL Community Server). We are using version 5.6 ( If you are not sure how to install it please use this link : Install MySQL server )
- Maven 3.0.4
Step 1. Create table to MySQL database: Please use below script to create table and insert sample data for test to the MySQL database:
DROP TABLE person
GO

CREATE TABLE person (
    id int NOT NULL AUTO_INCREMENT,
	First_Name 	varchar(25) NULL,
	Last_Name  	varchar(25) NULL,
	Street_Name	varchar(25) NULL,
	City       	varchar(25) NULL,
	State      	varchar(25) NULL,
	Country    	varchar(25) NULL,
    PRIMARY KEY (id)
	)
GO
Step 2: Create dynamic web project in eclipse name: SpringMaven (Please use this link if you are not sure how to create maven project in eclipse: Create maven project in eclipse)
Step 3: Enter all required dependencies to maven pom.xml file as below:
<project xmlns="http://maven.apache.org/POM/4.0.0" xmlns:xsi="http://www.w3.org/2001/XMLSchema-instance" xsi:schemaLocation="http://maven.apache.org/POM/4.0.0 http://maven.apache.org/xsd/maven-4.0.0.xsd">
  <modelVersion>4.0.0</modelVersion>
  <groupId>org.springframework.samples.service.service</groupId>
  <artifactId>SpringMaven</artifactId>
  <version>0.0.1-SNAPSHOT</version>
  <packaging>war</packaging>

	<dependencies>

		<!-- Spring and Transactions -->
		<dependency>
		    <groupId>org.springframework</groupId>
		    <artifactId>spring-jdbc</artifactId>
		    <version>3.0.3.RELEASE</version>
		</dependency>

		<!-- MySql 5.5 Connector -->
	    <dependency>
			<groupId>mysql</groupId>
			<artifactId>mysql-connector-java</artifactId>
			<version>5.1.29</version>
		</dependency>

	</dependencies>
</project>
Step 4: Create and configure application-config.xml file with all required value as below:
<?xml version="1.0" encoding="UTF-8"?>

<beans xmlns="http://www.springframework.org/schema/beans" xmlns:xsi="http://www.w3.org/2001/XMLSchema-instance"
	xmlns:context="http://www.springframework.org/schema/context"
	xsi:schemaLocation="http://www.springframework.org/schema/beans http://www.springframework.org/schema/beans/spring-beans.xsd
		http://www.springframework.org/schema/context http://www.springframework.org/schema/context/spring-context.xsd">

  <bean id="dataSource" class="org.springframework.jdbc.datasource.DriverManagerDataSource">
	<property name="driverClassName" value="com.mysql.jdbc.Driver"></property>
	<property name="url" value="jdbc:mysql://localhost:3306/JavaHonk"></property>
	<property name="username" value="root"></property>
	<property name="password" value="admin"></property>
  </bean>

        <bean id="jdbcTemplate" class="org.springframework.jdbc.core.JdbcTemplate">
  	<property name="dataSource" ref="dataSource"></property>
  </bean>

  <bean id="personDAO" class="com.javahonk.dao.PersonDAO">
  	<property name="jdbcTemplate" ref="jdbcTemplate"></property>
  </bean>

</beans>
Step 5: Create Person.java inside com.javahonk.di.bean package:
package com.javahonk.di.bean;

import java.io.Serializable;

public class Person implements Serializable{

    private static final long serialVersionUID = 1L;
    private String FirstName;
    private String LastName;
    private String street;
    private String city;
    private String state;
    private String country;

    public Person(String firstName, String lastName, String street,
	    String city, String state, String country) {
	super();
	FirstName = firstName;
	LastName = lastName;
	this.street = street;
	this.city = city;
	this.state = state;
	this.country = country;
    }

    public String getFirstName() {
        return FirstName;
    }
    public void setFirstName(String firstName) {
        FirstName = firstName;
    }
    public String getLastName() {
        return LastName;
    }
    public void setLastName(String lastName) {
        LastName = lastName;
    }
    public String getStreet() {
        return street;
    }
    public void setStreet(String street) {
        this.street = street;
    }
    public String getCity() {
        return city;
    }
    public void setCity(String city) {
        this.city = city;
    }
    public String getState() {
        return state;
    }
    public void setState(String state) {
        this.state = state;
    }

    public String getCountry() {
        return country;
    }

    public void setCountry(String country) {
        this.country = country;
    }

}
Step 6: Create Interface IPersonDAO.java inside com.javahonk.dao package:
package com.javahonk.dao;

import com.javahonk.di.bean.Person;

public interface IPersonDAO {
    int insertUser(Person person);
    void deletePerson(int personID);
    void selectAllPerson();

}
Step 7: Create PersonDAO.java class inside com.javahonk.dao package which implements IPersonDAO interface:
package com.javahonk.dao;

import java.sql.Types;
import java.util.Iterator;
import java.util.List;
import java.util.Map;

import org.springframework.jdbc.core.JdbcTemplate;

import com.javahonk.di.bean.Person;

public class PersonDAO implements IPersonDAO {

    private JdbcTemplate jdbcTemplate;

    @Override
    public int insertUser(Person person) {
	String inserQuery = "INSERT INTO person(First_Name, "
		+ "Last_Name, Street_Name, City, State, "
		+ "Country) VALUES(?, ?, ?, ?, ?, ?)";
	Object[] params = new Object[] { person.getFirstName(),
		person.getLastName(), person.getStreet(),
		person.getCity(), person.getState(),
		person.getCountry() };
	int[] types = new int[] { Types.VARCHAR, Types.VARCHAR,
		Types.VARCHAR, Types.VARCHAR, Types.VARCHAR,
		Types.VARCHAR };
	return jdbcTemplate.update(inserQuery, params, types);
    }

    @Override
    public void deletePerson(int personID) {
	String delQuery = "delete from person where id = ?";
	int count = jdbcTemplate.update(delQuery,
		new Object[] { personID });
	if (count != 0)
	    System.out.println("Person deleted successfully.");
	else
	    System.out
		    .println("Couldn't delete person with id doesn't exist");
    }

    @Override
    public void selectAllPerson() {
	String sql = "select * from person";
	List<Map<String, Object>> listOfPerson = jdbcTemplate
		.queryForList(sql);
	for (Iterator iterator = listOfPerson.iterator(); iterator
		.hasNext();) {
	    Map<String, Object> map = (Map<String, Object>) iterator
		    .next();
	    System.out.println(map);

	}

    }

    public JdbcTemplate getJdbcTemplate() {
	return jdbcTemplate;
    }

    public void setJdbcTemplate(JdbcTemplate jdbcTemplate) {
	this.jdbcTemplate = jdbcTemplate;
    }

}
Step 8: Finally create main TestSpringJDBCTemplate.java class to test spring jdbctemplate tutorial:
package com.javahonk;

import org.springframework.context.support.ClassPathXmlApplicationContext;

import com.javahonk.dao.IPersonDAO;
import com.javahonk.di.bean.Person;

public class TestSpringJDBCTemplate {

    public static void main(String[] args) {
	ClassPathXmlApplicationContext applicationContext =
		new ClassPathXmlApplicationContext(
		"spring\\application-config.xml");

	IPersonDAO personDAO = applicationContext.getBean(
		"personDAO", IPersonDAO.class);

	System.out.println("All person list from table");
	personDAO.selectAllPerson();

	Person person = new Person("Mary", "Kay", "Mary st.",
		"Edison", "NJ", "USA");
	personDAO.insertUser(person);
	System.out.println("User inserted to the table");

	personDAO.deletePerson(1);
	System.out.println("Person id 1 deleted from the table");

	applicationContext.close();

    }

}
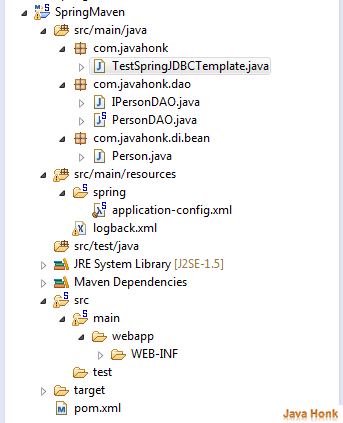
Step 9: Final project structure:
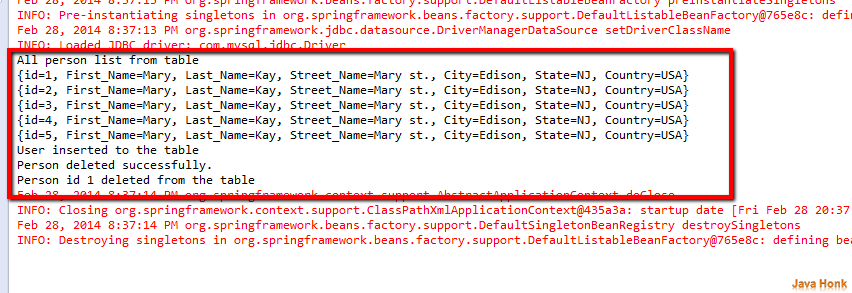
Step 10: Now we are all set to test our code. Right click TestSpringJDBCTemplate.java class –> Run As –> Java Application and it will show you below on console:
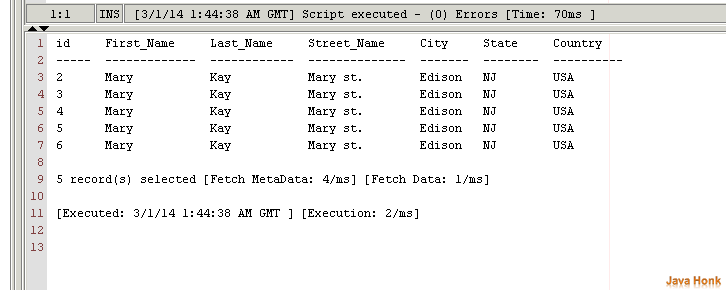
Step 11: Data inserted to the table:
![]() Download Spring jdbctemplate tutorial souce code: Spring jdbctemplate tutorial
Download Spring jdbctemplate tutorial souce code: Spring jdbctemplate tutorial


