Spring MVC Form Validation Using Annotation
Spring MVC @valid or Spring MVC form validation using annotation
Below example will show you how to do Spring MVC application form validation using annotation.
Below are needed
- Eclipse 3.2 or above (Download eclipse from eclipse.org/downloads)
- JDK 1.6 or above (Download from here: JDK 1.6)
- Tomcat 6 or above (Please follow link to install and configure tomcat in eclipse: Configure and Run Tomcat server in eclipse
- Spring jars : Jars
Please follow below steps:
- Create dynamic web project in eclipse name: DynamicRowAddSpring (Please use this link if you are not familiar how to create dynamic project in eclipse: Create Dynamic Web Project Eclipse)
- Create bean class and annotate with hibernate validator annotation. For this you will have to add hibernate annotation validation jar in your project. Create package com.javahorn.beans inside src folder and create classes inside it with same name from below:
package com.javahorn.beans;

import javax.validation.constraints.Pattern;

import org.hibernate.validator.constraints.NotEmpty;

public class Users {

	@NotEmpty
	private String name;
	// below pattern will match data in MM/DD/YYYY format
	@Pattern(regexp = "((?:0[1-9])|(?:1[0-2]))\\/((?:0[0-9])|(?:[1-2][0-9])|(?:3[0-1]))\\/(\\d{4})")
	private String dob;
	@NotEmpty
	private String email;
	@NotEmpty
	private String phone;

	public Users(String name, String dob, String email, String phone,
			String address, Long pincode, String country) {
		super();
		this.name = name;
		this.dob = dob;
		this.email = email;
		this.phone = phone;
	}

	public Users() {
	}

	public String getName() {
		return name;
	}

	public void setName(String name) {
		this.name = name;
	}

	public String getDob() {
		return dob;
	}

	public void setDob(String dob) {
		this.dob = dob;
	}

	public String getEmail() {
		return email;
	}

	public void setEmail(String email) {
		this.email = email;
	}

	public String getPhone() {
		return phone;
	}

	public void setPhone(String phone) {
		this.phone = phone;
	}

}
- Please have a look above code I have created field validation and their annotation. Below is again screen shot:
- Create controller name TestController.java and copy paste below code. To do form validation to work, please annotate the “JSR annotated model object” via @Valid.
package com.javahorn.controller;

import javax.validation.Valid;

import org.springframework.stereotype.Controller;
import org.springframework.validation.BindingResult;
import org.springframework.web.bind.annotation.ModelAttribute;
import org.springframework.web.bind.annotation.RequestMapping;
import org.springframework.web.bind.annotation.RequestMethod;
import org.springframework.web.servlet.ModelAndView;

import com.javahorn.beans.Users;

@Controller
public class TestController {

	@RequestMapping(value = "/helloWorld.web", method = RequestMethod.GET)
	public ModelAndView printWelcome(@ModelAttribute("user") Users user) {

		ModelAndView mav = new ModelAndView("SubmitForm");
		mav.addObject("message", "Hello World!!!");
		return mav;

	}

	@RequestMapping(value = "/submitForm.web", method = RequestMethod.POST)
	public ModelAndView submitForm(@Valid @ModelAttribute("user") Users user,BindingResult bindingResult) {

		Users users=new Users();
		ModelAndView mav = new ModelAndView("SubmitForm");
		mav.addObject("users", users);
		return mav;

	}

}
- Create dispatcher-servlet.xml inside WEB-INF folder and copy paste below content. Please note: To validate form using annotation you will have to add: tag and to read error message from properties files you will to add ResourceBundleMessageSource bean. Please copy paste below xml file and paste to your dispatcher-servlet.xml file:
<?xml version="1.0" encoding="UTF-8"?>
<beans xmlns="http://www.springframework.org/schema/beans"
	xmlns:context="http://www.springframework.org/schema/context"
	xmlns:mvc="http://www.springframework.org/schema/mvc"
	xmlns:xsi="http://www.w3.org/2001/XMLSchema-instance"
	xsi:schemaLocation="
        http://www.springframework.org/schema/beans
        http://www.springframework.org/schema/beans/spring-beans-3.0.xsd
        http://www.springframework.org/schema/context
        http://www.springframework.org/schema/context/spring-context-3.0.xsd
        http://www.springframework.org/schema/mvc
        http://www.springframework.org/schema/mvc/spring-mvc-3.0.xsd">

	<context:component-scan base-package="com.javahorn.controller" />
	<context:component-scan base-package="com.javahorn.beans" />
	<mvc:annotation-driven />

	<bean
		class="org.springframework.web.servlet.view.InternalResourceViewResolver">
		<property name="prefix">
			<value>\WEB-INF\jsp\</value>
		</property>
		<property name="suffix">
			<value>.jsp</value>
		</property>
	</bean>

	<!-- bind your messages.properties -->
	<bean class="org.springframework.context.support.ResourceBundleMessageSource"
		id="messageSource">
		<property name="basename" value="messages" />
	</bean>

</beans>
- Error message configuration: You already added bean class in dispatcher-servlet.xml file now create messages.properties file inside src folder and copy paste below content in it.
NotEmpty.user.name = Name is required!
NotEmpty.user.dob = DOB is required!
Pattern.user.dob = DOB format not matched (MM/DD/YYYY)
NotEmpty.user.email = Email is required!
NotEmpty.user.phone = Phone is required!
- Create folder name jsp inside WEB-INF folder and create jsp file name SubmitForm.jsp. Copy paste below jsp content in it
<%@ taglib prefix="form" uri="http://www.springframework.org/tags/form"%>
<%@ page language="java" contentType="text/html; charset=ISO-8859-1"
    pageEncoding="ISO-8859-1"%>
<!DOCTYPE html PUBLIC "-//W3C//DTD HTML 4.01 Transitional//EN" "http://www.w3.org/TR/html4/loose.dtd">
<html>
<head>
<meta http-equiv="Content-Type" content="text/html; charset=ISO-8859-1">
<title>Insert title here</title>
<style type="text/css">
.error{color: #ff0000;font-size: 14px;height: 3px;font-weight: bold;}
</style>
</head>
<body>

<form:form commandName="user" action="submitForm.web" method="post">

            <fieldset>
                <legend>User details</legend>
                <ol>
                    <li>
                        <label for=name>Name</label>
                        <form:input path="name"  type="text" placeholder="First and last name" />
                        <form:errors path="name" class="error"/>
                    </li>
                    <li>
                        <label for=name>Date</label>
                    <form:input path="dob" type="date" required="true" />
                    <form:errors path="dob" class="error"/>
                    </li>
                    <li>
                        <label for=email>Email</label>
                        <form:input path="email" type="text"/>
                        <form:errors path="email" class="error"/>
                    </li>
                    <li>
                        <label for=phone>Phone</label>
                        <form:input path="phone" type="text"/>
                        <form:errors path="phone" class="error"/>
                    </li>
                 </ol>
            </fieldset>
            <fieldset>
                <button type=submit>Save User Details!</button>
            </fieldset>
        </form:form>

</body>
</html>
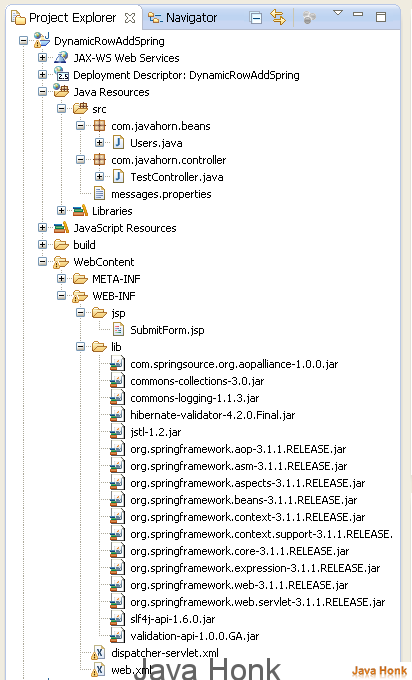
- That’s it. Finally your project structure should look like below:
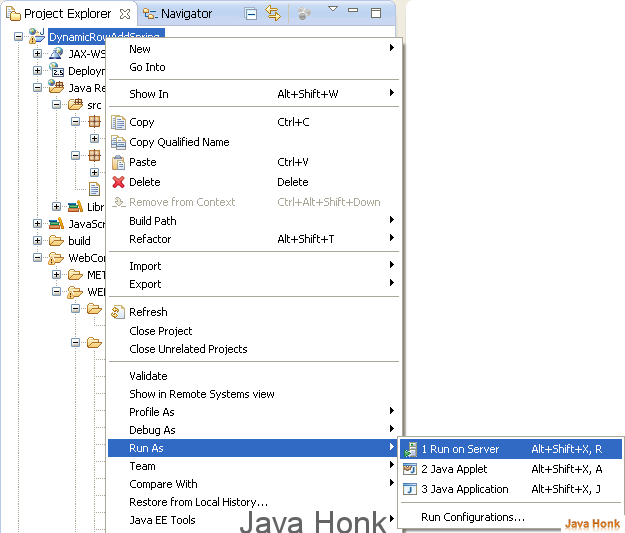
- Now right click project –> Click Run As –> Run on Server as below:
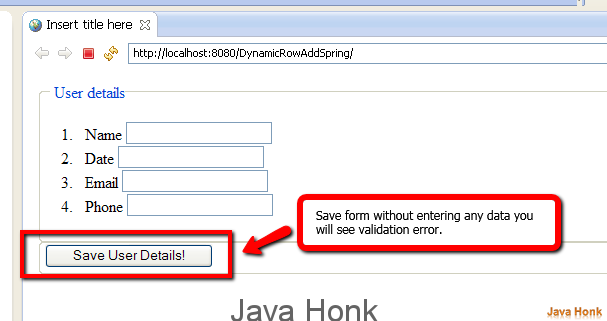
- You will see below. URL: http://localhost:8080/DynamicRowAddSpring/
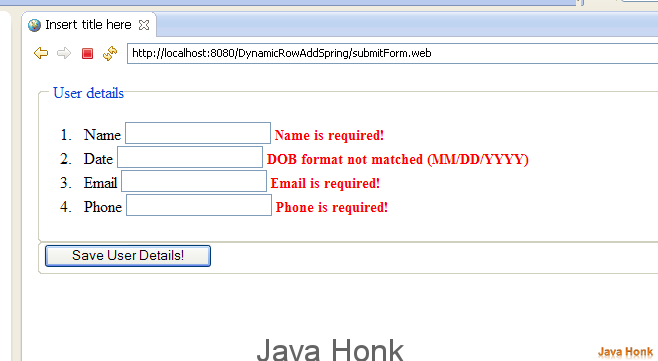
- Once you Click Save User Details button you will see below validation error message.
- That’s it we are done with Spring MVC Form Validation Using Annotation .


