Spring ResourceLoader Injection : ResourceLoader Injection is technique to load resource file dynamically whenever needed. Please follow below steps:
Step 1: Create bean class name SpringResourceInjection.java. Please have a look carefully on below java class as we have used @Autowired annotation which don’t require get and setter method for properties setting. Only we need to mentioned in context file tag which tell spring framework that we are using annotation for injection.
package com.javahonk.di.bean;

import org.springframework.beans.factory.annotation.Autowired;
import org.springframework.core.io.Resource;
import org.springframework.core.io.ResourceLoader;

public class SpringResourceInjection {

    @Autowired
    private ResourceLoader resourceLoader;

    public Resource loadDynamicResource() {
	boolean loadFirstFile = true;
	if (loadFirstFile) {
	    return resourceLoader
		    .getResource("spring/ResourceTestFile.txt");
	} else {
	    return resourceLoader
		    .getResource("spring/ResourceTestFile2.txt");
	}
    }
}
Step 2: Create spring\springResourceContext.xml context file and include below:
<?xml version="1.0" encoding="UTF-8"?>
<beans xmlns="http://www.springframework.org/schema/beans"
	xmlns:xsi="http://www.w3.org/2001/XMLSchema-instance"
	xmlns:context="http://www.springframework.org/schema/context"
	xsi:schemaLocation="http://www.springframework.org/schema/beans
	http://www.springframework.org/schema/beans/spring-beans-3.0.xsd
	http://www.springframework.org/schema/context
	http://www.springframework.org/schema/context/spring-context-3.0.xsd">

<context:annotation-config />

<bean id="resourceInjection" class="com.javahonk.di.bean.SpringResourceInjection">
</bean>
</beans>
Step 3: Create spring\ResourceTestFile.txt test file to read and enter some data:
Resource test = Successfull
Step 4: Create spring\ResourceTestFile2.txt test file to read and enter some data and you SpringResourceInjection.java could see in SpringResourceInjection.java class for demo we have created condition to load files.
Resource test = Successfull
Step 5: Finally, create main ReadSpringResourceFile.java class which will load the context file and the resource file:
package com.javahonk;

import java.io.InputStream;
import java.util.Scanner;

import org.springframework.context.ApplicationContext;
import org.springframework.context.support.ClassPathXmlApplicationContext;
import org.springframework.core.io.Resource;

import com.javahonk.di.bean.SpringResourceInjection;

public class ReadSpringResourceFile {
    public static void main(String[] args) throws Exception {
	ApplicationContext applicationContext =
		new ClassPathXmlApplicationContext(
		"spring/springResourceContext.xml");
	InputStream inputStream = null;
	Scanner scanner = null;
	try {

	    SpringResourceInjection springResourceInjection = applicationContext
		    .getBean("resourceInjection",
			    SpringResourceInjection.class);

	    Resource dynamicResourceViaResourceLoader = springResourceInjection
		    .loadDynamicResource();
	    inputStream = dynamicResourceViaResourceLoader
		    .getInputStream();
	    scanner = new Scanner(inputStream);
	    while (scanner.hasNext()) {
		System.out.println(scanner.nextLine());
	    }

	} finally {
	    if (inputStream != null) {
		inputStream.close();
	    }
	    if (null != scanner) {
		scanner.close();
	    }
	}
    }

}
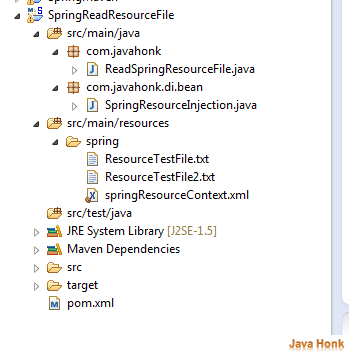
Step 6: Final project snap shot:
Step 7: Finally we are ready to run main class which will read spring\ResourceTestFile.txt and print output on console. To Run –> Right click ReadSpringResourceFile.java –> Run As –> Java Appliction then you will below output on console:
Step 8:. That’s it.
![]() Download project: Spring ResourceLoader Injection
Download project: Spring ResourceLoader Injection

